Friday, February 28, 2014

Hotel Review: Best Western PLUS Milford Hotel + Watermill Restaurant @ Leeds, United Kingdom

During a recent business trip to Yorkshire, I stayed at the Best Western PLUS Milford Hotel. Being a business trip not much sightseeing could be done, so most of my time was spent in the hotel and its restaurant, Watermill. It was a rather pleasant stay at the hotel, with rooms being comfy and surprisingly, food at the restaurant was consistently good throughout the stay. I later found out that Watermill Restaurant has a pretty good reputation in the area. The hotel itself is situated about 30 minutes drive from the cities of Leeds and Yorkshire and on a main road. Not too sure about the rooms facing the main road but with mine on the opposite side it was unaffected by any sort of noise. All rooms also come with complimentary wifi.

The room. Nice, comfy bed


The toilets are nice and modern with a nice addition of heated floors. Gilchrist and Soames toiletries are provided for hotel guests


Breakfast in the hotel was a great affair. Guests have a choice of Continental and English Breakfast, with locally sourced ingredients. Naturally, being a big lover of the traditional English breakfast it was a no-brainer for me. You get to choose from a huge list of items cooked to order including eggs (fried, scrambled or poached), bacon, sausages, grilled tomatoes and mushrooms, smoked fish (salmon, haddock, or Yorkshire kipper), black pudding, hash browns, baked beans and Yorkshire honey in addition to the buffet spread. It was rather nice being able to mix and match different items on the breakfast menu each morning.


Dinner at the restaurant was another highlight with the food coming out of the kitchen consistent in terms of quality and taste. Some items stood out more than others but in total dining at the Watermill was a good experience with few complaints. Standouts from the menu are the steak, fish and chips, scallops and the sticky toffee pudding.

Yorkshire Dales ribeye steak, hand-cut chips and peppercorn sauce (£16.45)


Duck confit with mashed potato and spinach (£10.95)

Sticky Toffee Pudding with butterscotch sauce and vanilla ice cream

Traditional Black Sheep Ale Battered Haddock and Chips (£13.95)


 Scallops on Provençale sauce (£4.95)

Slow Cooked Pork Belly served with puy lentils, roasted apple and bacon red wine jus (£10.95)


Location: Best Western Milford Hotel, Great North Road, Peckfield, Leeds, West Yorkshire, LS25 5LQ, United Kingdom.

Tel: +44 1977 681800

GPS Coordinates: 53.778087,-1.309961

Website: http://www.bestwestern.co.uk/hotels/milford-hotel-leeds-83728/hotel-info/default.aspx


*This is a guest post by The Unc.


If you enjoyed reading my posts, LIKE me on Facebook! You can also follow me on Instagram (@babysumo) for more photo updates. Thanks :)

Thursday, February 27, 2014

Recipe: Pan-roasted sea scallops with white wine, capers and lemon

As you all know, I love scallops so any opportunities of having this on my dinner table will be very welcomed. Usually I just sear it or stir fry it Chinese-style, but I wanted to be a bit more adventurous and hence tried this Italian-style scallops from Marco Canora. 


This recipe was taken off one of the cookbooks I got from BBW sale - Salt To taste by Marco Canora, one of New York's most respected chefs known for his intensely-flavored menus at his restaurants. The Hokkaido scallops are first cooked in the pan and later, a simple pan sauce is poured over the scallops. The sauce contains shallots, capers, lemon and white wine. The sauce is pretty zingy, thanks to the lemon, however I would reduce the caper amount next time from 2 1/2 tablespoons to 1 - 1 1/2 tablespoons as it makes the sauce taste quite salty. Overall, we enjoyed this bold-tasting appetizer. If you like more delicate-tasting scallops, check out my other scallop recipes here.


A simple, tasty appetizer (Italian-style)


Pan roasted sea scallops with white wine, capers and lemon
Recipe adapted from Salt to Taste by Marco Canora
Preparation time: 10 - 15 minutes
Cooking time:
Serves 5, as an appetizer

Ingredients
For the scallops
About 2 1/2 tbsp extra virgin olive oil
15 medium sea scallops (I used Hokkaido scallops)
Salt and freshly ground pepper
1 tbsp unsalted butter

For the sauce
2 tbsp finely chopped shallot
1/2 tsp minced garlic
2 1/2 tbsp small capers
Juice of 1/2 lemon
1/4 cup dry white wine
3 tbsp chilled unsalted butter
2 tbsp finely chopped parsley
Salt and freshly ground pepper

For the scallops:
1. Wash and pat dry the scallops with a kitchen towel. Season them with salt and pepper.

2. Heat a large skillet over high heat. When the pan is hot, add enough oil to cover the bottom and swirl to make sure it spreads evenly. Wait until the oil begins to smoke, then place the scallops in the skillet, making sure to leave plenty of space between them.

3. Let the scallops cook undisturbed until a crust forms on the bottom, about 1-2 minute. Flip each scallop, lower the heat slightly and add the butter to the pan. Cook for another 1-2 minute until the scallops are just barely firm. Transfer the scallops to a plate while you make the sauce.

For the sauce:
1. Pour the excess butter out of the pan, leaving just a skim. Adjust the heat to medium and add the shallot. Cook until they begin to soften, about a minute. Add the garlic and cook another minute.

2. Add the capers, lemon juice and wine. Simmer vigorously until the pan is almost but not quite dry, about 2 minutes. Add any juices that have accumulated under the resting scallops. Make sure there are a couple of tablespoons of liquid in the pan (add a little water if the pan is dry). Finish the sauce by swirling in the butter, 1 tablespoon at a time.

3. Add parsley to the sauce and adjust the seasoning with salt and pepper. Reduce the heat to low and cook gently until the flavours blend for another minute or so.

4. Transfer the scallops to warm plates. Spoon the sauce over them and serve.


I am linking this to the Little Thumbs up "Lemon" event organised by Zoe from Bake for Happy Kids and Doreen from My Little Favourite DIY, hosted by Grace from Life can be Simple. You can link your posts here.

I am submitting this to Cook-Your-Books #9 hosted by Joyce of Kitchen Flavours .

If you enjoyed reading my posts, LIKE me on Facebook! You can also follow me on Instagram (@babysumo) for more photo updates. Thanks :)

Wednesday, February 26, 2014

Recipe: Quinoa salad with cucumber, red pepper & fresh herbs

Having eaten quinoa a couple of times in restaurants, we finally bought a packet home for our kitchen experiments. When I made my slow-roasted leg of lamb, I thought of serving a quinoa salad as a side dish - I had a brief idea of what I wanted in my salad - cucumbers and mint, so I googled and found this recipe on BBC Food which fitted the bill.


Quinoa salad with cucumber, red pepper and herbs


Quinoa is a complete protein, containing all eight of the essential amino acids. It has also been recognised by the United Nations as a supercrop for its health benefits: packed with dietary fibre, phosphorus, magnesium and iron plus it is also gluten-free and easy to digest.

A few important things to remember when cooking quinoa- it is important to rinse it under running water for several minutes in a fine-mesh strainer to remove the bitter coating (saponins) on the quinoa. For every cup of quinoa, you need to add 2 cups of water to cook. Once cooked, it is important to drain it well, then pour it back into the pan, cover and leave to stand for 10-15 minutes helps dry it out and fluff up.


After mixing all the ingredients and dressing it with olive oil and lemon juice, I thought the salad looked great - vibrant and appetizing. And for the taste test.... hurray it passed with flying colours! We loved it, the salad tasted light and refreshing and went well with the slow-roasted leg of lamb. My parents, who were quinoa virgins, also gave this a big thumbs up. :) Not only is this delicious, it is super healthy too - definitely something I would not mind having on a regular basis.


Quinoa salad with cucumber, red pepper and herbs
Recipe by Baby Sumo, adapted from here
Preparation time: 15-20 minutes
Cooking time: 15 minutes
Serves 6-8

Ingredients
200g quinoa
A handful fresh parsley, roughly chopped
1 tbsp chopped fresh mint
1/2 red pepper, finely diced
1 Japanese cucumber, finely diced
2 shallots, finely diced
3-4 tbsp extra virgin olive oil
3/4 lemon, juice only
Salt and freshly ground black pepper


1. Place quinoa in a fine-mesh strainer and rinse under tap water for 2-3 minutes.

2. Add rinsed quinoa and 400g water to a saucepan and bring to the boil then lower to medium heat. Simmer for 15 minutes, or until the quinoa becomes translucent and the white germ forms a visible spiral on the exterior of the quinoa grain.

3. Drain well using a fine-mesh strainer, then return the quinoa to pot and cover, letting it fluff up for 10-15 minutes.

4. Mix together the quinoa, herbs and vegetables in a bowl and dress with olive oil and lemon juice. Season, to taste, with salt and freshly ground black pepper.


Note: For every 1 cup uncooked quinoa, it will yield 3 cups cooked quinoa. Herbs used are harvested from my herb garden :)


I am linking this to the Little Thumbs up "Lemon" event organised by Zoe from Bake for Happy Kids and Doreen from My Little Favourite DIY, hosted by Grace from Life can be Simple. You can link your posts here.

If you enjoyed reading my posts, LIKE me on Facebook! You can also follow me on Instagram (@babysumo) for more photo updates. Thanks :)

Tuesday, February 25, 2014

A Delectable Valentine @ Sage Restaurant & Wine Bar, KL

Me and you. It's Valentine's Day and we're at my favorite restaurant - Sage KL. They say the way to a man's heart is through his stomach, the same applies for this girl here ;)


We're dining here on Valentine's eve, away from the Valentine crowd. Good choice Hubby :) Let's go for a 4-course lunch today, you say. Oh yes, please.

We started off with the green tea buckwheat noodle with panache of seafood, aonoriko and caviar, prettily garnished with edible flowers and herbs. The seafood, which included raw scallops, tuna and prawn was super fresh and delicate. My favorite dish of the afternoon :)


Next came the warm starter, the black truffle risotto served with glazed duck breast and luscious foie gras. Quite happy with the size of the foie, and the sauce was absolutely delicious. We mopped it all up with the warm bread.


Mains was grain fed beef served two ways - on one side we have the wasabi crusted beef cheek and on the other grilled beef, served with yuzukosho and red wine sauce.I prefer my beef naked, hence the grilled beef gets my vote.


Dessert was fantastic, possibly one of the best ones we've had at Sage over the years - a rich, creamy mille feuille of praline with toffee anglaise and almond nougat. What a great way to end our meal :)


Pork-free.

For their weekly lunch menu, click here. Full a la carte menu here.

Dress code: Smart casual.

Opening hours: Lunch:Monday to Friday 12.00pm to 2.00pm; Dinner:Monday to Saturday 6.00pm to 10.30pm. Closed on Sunday.

Price: RM100 nett per person for 3-course lunch RM120 nett for 4-course.

Location: Sage Restaurant & Wine Bar, The Gardens Residences, Level 6, The Gardens, Mid Valley City, Lingkaran Syed Putra, 59200 Kuala Lumpur.

Tel: 03-2268 1328

*Children below the age of 6 are not allowed in the restaurant.


If you enjoyed reading my posts, LIKE me on Facebook! You can also follow me on Instagram (@babysumo) for more photo updates. Thanks :)

Monday, February 24, 2014

Recipe: Chinese braised chicken with bitter gourd 苦瓜鸡

A couple of months ago, we bought a bitter gourd, cooked it and threw some of the seeds into our garden. To our surprise, a bittergourd plant sprouted and before long, we made our first bittergourd harvest. Thanks to this bittergourd plant, we have had at least a dozen homegrown bitter gourds to cook with :)

Chinese braised chicken with bitter gourd 


Bitter gourd or melon is a green,edible vegetable which is crunchy and very bitter. Its flowers are yellow in colour and the plant thrives in hot, humid conditions. It has many health benefits such as lowering blood glucose in diabetics. Baby D likes harvesting the bitter gourds from our garden.

 Baby D checking if the plant is big enough to harvest


Yellow flowers


Our homegrown bitter gourd 苦瓜


One of our favorite ways of cooking and eating bitter gourd is to braise it with chicken breast chunks. These two ingredients are braised with mushroom sauce and ginger wine. I also like adding some coarse black pepper which accentuates the flavours of the dish. The braising sauce is also super delicious on some white rice.


Chinese braised chicken with bitter gourd 苦瓜鸡
Recipe by Baby Sumo
Preparation time: 10 minutes
Cooking time: 13-15 minutes
Serves 2-3

Ingredients
200g chicken breast, cut into bite-sized chunks
1 bittergourd (about 350g), washed
4 cloves garlic, finely chopped
2 tbsp canola oil
150ml water
1/2 tsp ginger wine
1 1/2 tbsp mushroom sauce
1/8 tsp coarse black pepper
Salt, to taste

1. Trim the ends off the bittergourd, then cut into half. Then cut again into half lengthwise, and using a spoon, scoop out the seed cavity. Then cut into 1cm pieces (it will be shaped like a crescent).

2. In a wok, heat the oil over medium high heat. Add the garlic and stir fry for about 1 1/2 minutes, until lightly browned. Add the chicken and cook for a further 2 minutes, stirring constantly.

3. Add the bittergourd and stir fry for about 30 seconds, then add the water and bring to the boil. Add the mushroom sauce, ginger wine and coarse black pepper and braise for about 6-8 minutes until you achieve your preferred doneness. The bittergourd should be soft on the outside with a slight bite in the centre.

3. Season with more salt as necessary, then serve with white rice.


If you enjoyed reading my posts, LIKE me on Facebook! You can also follow me on Instagram (@babysumo) for more photo updates. Thanks :)

Sunday, February 23, 2014

Recipe: Slow-roasted Leg of Lamb with Garlic & Rosemary (Heston Blumenthal)

We were watching MasterChef Australia one evening, and Heston Blumenthal, one of my favorite British chef came on and showed the contestants how to cook a leg of lamb. On Hubby's birthday this year, he put in a request for Heston's lamb - we've cooked roast leg of lamb before, but Heston's cooking and carving method is slightly different, so I was excited to try it!


Slow-roasted leg of lamb with garlic and rosemary


Heston suggests using anchovy fillets,as it gives the lamb a unique savoriness but since this is not something we can get easily from regular supermarkets here, I forego it and settled for garlic and rosemary only, and followed the rest of the recipe. The garlic is blanched in milk first before placed in the leg of the lamb as it gives the garlic a mild, sweet and nutty flavour; if using raw garlic, the taste will be more pungent. If you feel that pouring away 400ml milk just for blanching the garlic is wasteful, then by all means skip this step and just use raw garlic. Personally I feel it won't affect the taste of the lamb much.

The leg of lamb is slow roasted at 90°C until the internal temperature reaches 57°C, this took us slightly over 2 hours for a-2kg lamb. Rest it for 30 minutes in a warm place, before carving.


Now here comes the most important part - carving the meat. This is the key to achieving the extra tender, juicy mouthfeel. The meat has to be cut from the top, downwards until the knife meets the bone, then the knife is run horizontally across the meat, just above the bone. This way you get chunks of meat, rather than slivers. I never would have thought this would make the world of difference, but it does!

This is by far the best of roast leg of lamb I have ever tasted. Beautifully pink meat throughout and slicing it the Heston way makes it taste extra tender and delicious! We served the tender lamb with homemade mint sauce, cheesy mash pots, grilled zucchini, and quinoa salad. Birthday boy was absolutely delighted with the meal.


Slow-cooked roasted leg of lamb with garlic and rosemary 
Recipe by Baby Sumo, adapted from Heston Blumenthal
Preparation time: 10 minutes
Cooking time: 2 hrs 30 minutes
Serves 6-8

Ingredients
2.0kg lamb leg, on the bone
3 tbsp canola oil
400g skim milk
6 garlic cloves, halved
4 rosemary sprigs
Salt, to taste


To serve
Homemade fresh mint sauce
Gravy


1. Preheat oven to 90°C (roast mode).

2. Heat oil in a flameproof roasting pan over high heat until smoking. Season lamb with salt, then sear until completely golden brown. Place a roasting rack underneath the lamb set inside the pan.

3. Meanwhile, bring 100g milk to the simmer in a saucepan over medium heat. Add garlic and allow to simmer for 1 minute. Drain through a fine sieve, retaining the garlic, and discarding the milk. Repeat process 3 times using the remaining milk.

4. Cut blanched garlic into slivers. Using a sharp knife, cut small slits in the surface of the lamb at regular intervals. If necessary, use a small spoon to enlarge holes. Fill holes with an anchovy slice, a garlic sliver and a few rosemary leaves.


5. Place lamb in oven for 2 - 2 1/4 hours or until internal temperature reaches 57°C.

6. Remove lamb from oven, wrap in foil, and set aside to rest for at least 30 minutes.

7. Meanwhile, place roasting pan over medium heat. Add a splash of white wine to deglaze, whisk in mustard and stock, then reduce to a saucy consistency. Pour into a warm jug.

8. To serve, remove foil, and place lamb on a chopping board. Cut meat from the top, downwards, until the knife meets bone, to desired thickness, all the way along the top of the leg. Run the knife horizontally across the meat, just above the bone, separating the slices. Turn over and repeat on other side.


9. Arrange lamb on a platter and serve with side dishes of your choice. We served with homemade mint sauce, cheesy mash pots, grilled zucchini, and quinoa salad (recipe here).


Check out the recipe here for slow roasted leg of lamb with anchovies, garlic and rosemary.


If you enjoyed reading my posts, LIKE me on Facebook! You can also follow me on Instagram (@babysumo) for more photo updates. Thanks :)

*This recipe was featured on Asian Food Channel's Facebook page on 17 December 2014.

Friday, February 21, 2014

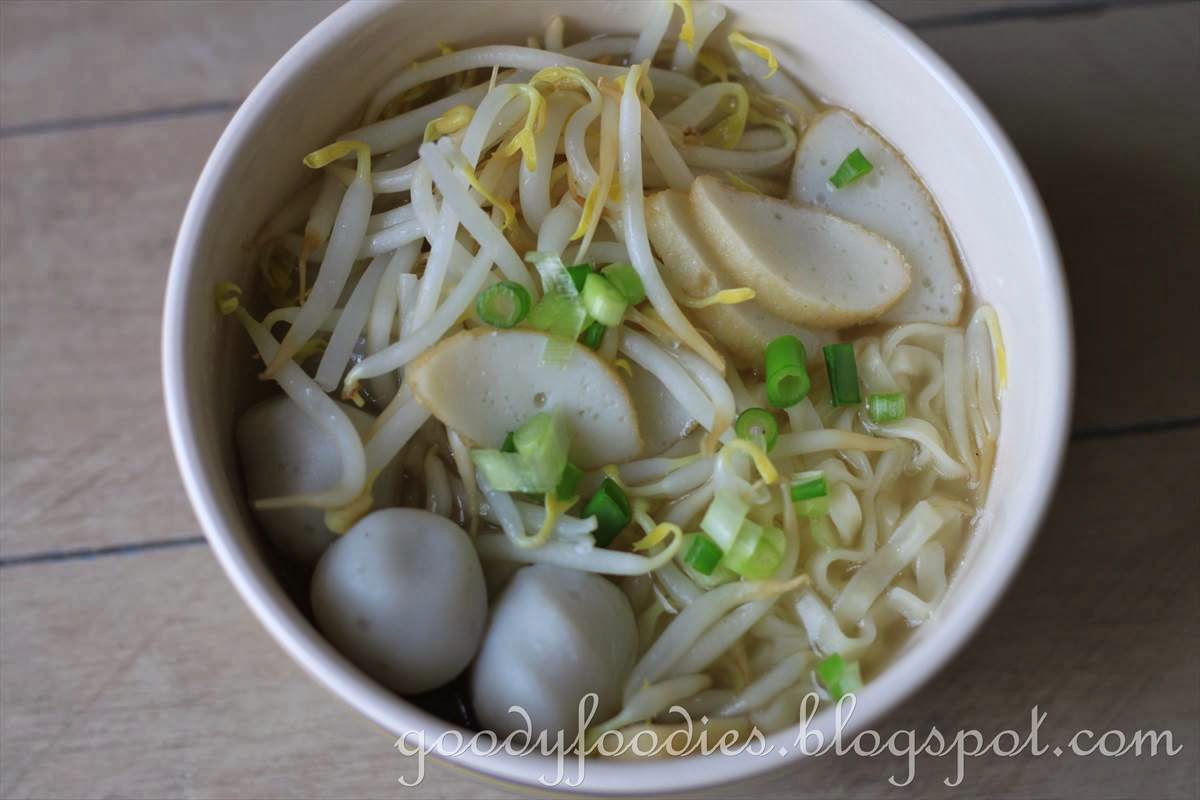
Recipe: Chinese fishball noodle soup 鱼丸粉

Most kids love fishball noodle soup, mine included. This can commonly be found in hawker centres around Malaysia. You can also easily recreate this at home, and I am pleased to share this recipe which tastes just like the stall we always frequent! :)


We usually go for kuay teow or tanghoon (glass noodles) when we're eating out, but at home, you can use any noodles you have on hand. The stock is made using ikan bilis (dried anchovies), which is gently simmered for 10 minutes. I am using store bought fishballs and fish cake, but if you want to make your own, go for it. I managed to buy some fat crunchy Ipoh beansprouts too, which are added in at the last minute of cooking.


A bowl of comfort :)


We love it - comforting, nutritious and delicious, all in one bowl!

Baby D loved this a lot, and slurped up all the noodles and soup. 

Crafts we made earlier that morning :)


Chinese fish ball noodle soup 鱼丸粉
Recipe by Baby Sumo
Preparation time: 5 minutes
Cooking time: 20 minutes
Serves 2


Ingredients
2 non-fried broad noodles
700ml water
1/2 tsp oil
1/3 cup ikan bilis (dried anchovy), gutted
1 tsp ikan bilis stock granules
A dash of white pepper

10 fishballs
2 fishcakes, sliced thinly
100g beansprouts
1 spring onion

1. In a non-stick saucepan, heat oil over medium high heat. Add ikan bilis and fry for about 2 minutes, then add water and bring to the boil. Once boiling, lower to medium low heat and simmer for about 10 minutes.

2. In a separate pot, bring a pot of salted water to the boil. Add noodles and cook for 3 minutes, until cooked through. Drain and divide into 2 bowls.

3. Using a straining ladle, remove ikan bilis from saucepan (Step 1). Season with ikan bilis stock granules and white pepper. Add fishballs and fishcake,and cook for about 2 minutes. Finally, add the beansprouts and cook for about 1 minute.

4. Ladle soup and other ingredients into bowls. Garnish with spring onion.


Note: You can use any noodle of your choice - kuay teow, meehoon, tanghoon (glass noodles), or yellow noodles. Approx. 110g for 2pax.


If you enjoyed reading my posts, LIKE me on Facebook! You can also follow me on Instagram (@babysumo) for more photo updates. Thanks :)
Related Posts Plugin for WordPress, Blogger...