Showing posts with label Baking. Show all posts

Sunday, January 30, 2022

Recipe: Tiger Stripes German Cookies

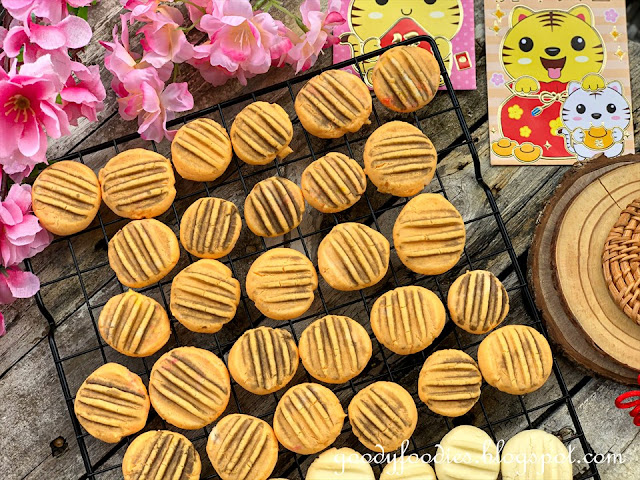
German cookies is one of our must-have CNY cookies. Since it's the Year of the Tiger, we got the idea of making these Tiger Stripes German Cookies. It's simple and quick, and looks the part. If you have 45 minutes to spare, then go ahead and make some for Chinese New Year. 

Tiger Stripes German Cookies

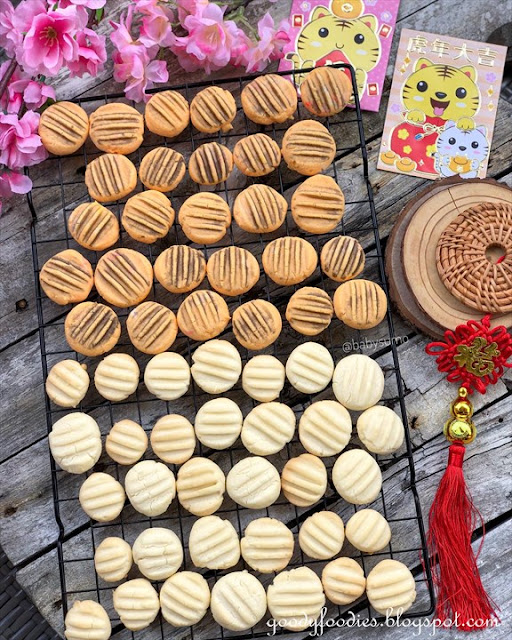
We made half regular and half Tiger Stripes German Cookies. 
Tiger Stripes German Cookies


Tiger Stripes German Cookies
Recipe by Baby Sumo
Preparation time: 30 minutes
Cooking time: 16 minutes (per batch)
Makes about 70 (or fills 2 tubs)

Ingredients
188g butter, softened at room temperature
60g icing sugar, sifted
188g potato starch/flour, sifted
120g plain flour, sifted

For the tiger stripes
1-2 drops orange food colouring
1-2 drops black food colouring
1 tbsp water


1. Preheat oven to 170°C (no fan). Line 2 baking trays with greaseproof paper.

2. Using an electric mixer, beat the butter and icing sugar until light and fluffy, about 5 minutes.

3. Add the potato starch and plain flour, and mix to form a soft dough. You should be able to pinch off some with your fingers and roll into a ball without any sticky residue. If it's too sticky, add an extra tablespoon of potato flour. 

4. We made half regular German cookies and half Tiger Stripes German Cookies. Divide the dough into half. 

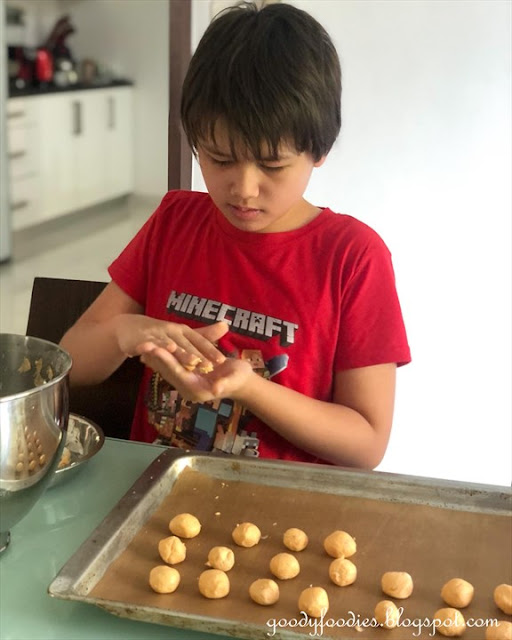
5. For the regular German cookies: Roll into small balls (about 2-3cm diameter), arrange on the baking tray and press lightly with a fork to flatten and make indentation, dipping the fork in water after each press to prevent the cookie dough from sticking to the fork.

6. For the Tiger Stripes German Cookies, add the orange food colouring to the dough and mix for 10 seconds until well incorporated. Roll into small balls as above and place on baking tray. In a small bowl, add 1 tbsp of water and 1-2 drops of black food colouring. Dip your fork into this black colored water and flatten the German cookies to make "stripes" indentation. 

making Tiger Stripes German Cookies


8. Bake in preheated oven for 16 minutes.  Allow to cool on baking tray and store in a tupperware once cooled.

Note: 
1. These cookies taste best after they have been stored for at least 24 hours.
2. If you do not have orange colouring, you can use pink + yellow food colouring at 1:1 ratio (ie 1 drop pink and 1 drop yellow food colouring). 

Tiger Stripes German Cookies

If you enjoyed reading my posts, LIKE me on Facebook! You can also follow me on Instagram (@babysumo) for more photo updates or subscribe to our YouTube channel.Thanks :)
Tuesday, May 5, 2020

Recipe: Mini lime syrup sponges (Nigella Lawson)

Need inspiration for Mother's Day?

Mother's Day is fast approaching (it's this coming Sunday, guys!), but if you haven't gotten her anything this year, I have a recipe especially for you.  These delicious Mini Lime Syrup Sponges will surely put a smile on your mother's face.... it certainly did for me, when BabySumoKids made these for me for teatime one day.

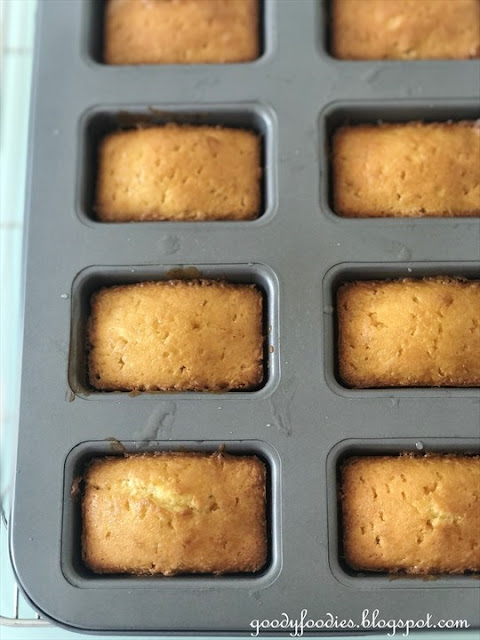
Mini lime syrup sponges


This beautiful recipe yields a soft, tender sponge soaked in lime syrup. Loved the lovely aroma from the lime zest too! The original recipe call for self-raising cake flour, however I've provided a substitution which you can use (with the more commonly found all-purpose flour in our kitchens).

This is an easy recipe, which kids can do all by themselves with minor supervision. They turned out absolutely divine and certainly went down a treat, perfect with a cuppa tea!

Mini lime syrup sponges recipe

Mini lime syrup sponges


Mini Lime Syrup Sponges
Recipe by Baby Sumo, adapted from Nigella Lawson
Preparation time: 15-20 minutes
Cooking time: 25 minutes
Makes 8

Ingredients
113g butter, softened at room temperature
1/2 cup plus 1 tbsp caster sugar
2 large eggs
Zest of 1 lime
1 cup all-purpose flour
2 tbsp cornstarch
1 1/2 tsp baking powder
Pinch of salt
4 tbsp milk

For the syrup:
4 tbsp lime juice (from 2-4 limes, depending on size)
5-6 tbsp icing sugar


1. Preheat oven to 180°C (no fan). Grease the inside of the 8-cup mini loaf pan using melted butter or oil.

2. Sift the all-purpose flour, cornstarch, baking powder and salt into a bowl. Mix well.

3. Using an electric mixer, cream the butter and sugar until pale, light and creamy, about 5-6 minutes. Then, add the eggs one at a time, and beat well, repeat until all eggs are used. Mixture should be light and fluffy. Add the lime zest.

4. Fold in sifted flour in 3 batches, until well combined. Add the milk and mix well. Your batter should be of a dropping consistency at this point.

5. Spoon batter into prepared mini-loaf pan and place in the preheated oven. Bake for 25 minutes.

Mini lime syrup sponges


6. While the cakes are cooking, make the syrup. Place lime juice and icing sugar in a small saucepan and gently heat and stir until sugar dissolves. See Note 1. 

7. As soon as the mini sponges are ready, take them out of the oven and prick all over using a cake tester or skewer. Then, spoon over lime syrup. Allow cake to cool for at least 1 hour before removing from tin. Grate lime zest over the cakes and serve.

Mini lime syrup sponges


Note:
1. Original recipe calls for 1/2 cup icing sugar for the syrup. However, I recommend you start with 1/4 cup (which is equivalent to 4 tbsp) and then gradually add 1 tbsp at a time to get the taste that you like. We used 5 tbsp in total.
2. If you do not have a mini loaf pan, you may also do this in 9 x 4 inch loaf pan, lined with baking paper. For the loaf pan, you will need to bake the cake for 45 minutes. You can get 16 slices from this loaf.

Mini lime syrup sponges Nigella Lawson

Mini lime syrup sponges Nigella Lawson

Mini lime syrup sponges Nigella Lawson

The same recipe, made in a loaf pan.Please see Note 2 above for baking instructions.
Lime syrup sponge cake recipe


Lime syrup sponge cake recipe


Mini Lime Syrup Sponges Mini Lime Syrup Sponges Mini Lime Syrup Sponges Mini Lime Syrup Sponges Mini Lime Syrup Sponges Mini Lime Syrup Sponges Mini Lime Syrup Sponges
If you enjoyed reading my posts, LIKE me on Facebook! You can also follow me on Instagram (@babysumo) for more photo updates or subscribe to our YouTube channel.Thanks :)
Sunday, April 12, 2020

Recipe: Carrot cupcakes with cream cheese frosting (Easter)

Happy Easter everyBUNNY! Whenever Easter approaches, I have a major urge to make (and eat!) carrot cake (or cupcakes) with cream cheese frosting.

Carrot cupcake with cream cheese frosting


This carrot cupcake recipe is an egg-cellent one to do with your children. Easy and straightforward, your children can measure out the ingredients, mix it all in a bowl and then fill them in cupcake liners. Once baked and cooled, the cupcakes are frosted with cream cheese. So moist and delicious!

Easter cupcakes recipe for kids

Carrot cupcakes with cream cheese frosting


Carrot cupcakes with cream cheese frosting
Recipe by Baby Sumo
Preparation time: 15 minutes
Cooking time: 22-25 minutes
Makes 8

For the cupcake
125g self raising flour, sifted
A pinch of salt
1 tsp ground cinnamon
1 tsp ground nutmeg
125g soft brown sugar
2 eggs, at room temperature
125ml corn oil
100g carrot, peeled and finely grated (approx. 2 medium carrot)
Zest of 1 orange or lemon
25g walnuts, chopped into small pieces
25g sultanas
1/2 tsp vanilla extract


For the cream cheese frosting
100g cream cheese, softened at room temperature
2-3 tbsp icing sugar

1. Preheat oven to 180°C (no fan). Line muffin-tray with 8 cupcake liners.

2. Place the flour, salt, ground cinnamon and nutmeg into a large bowl and stir in the brown sugar. Add the eggs and corn oil to the dry ingredients and mix well. Stir in the grated carrot, orange or lemon zest, sultanas, chopped walnuts and vanilla extract.

3. Fill the cupcake-liners to 2/3 full and then bake in the preheated oven for 22-25 minutes or until a skewer inserted in the centre comes out clean. Allow cupcakes to cool for 10 minutes before frosting.

Easter cupcakes recipe for kids


4. Meanwhile, make the frosting. Combine the cream cheese frosting with icing sugar and mix well. Set aside in fridge until required.

5. Using a knife, smear cream cheese frosting on the cupcakes.You may decorate as you like. For the carrot roses, peel long thin strips of carrot using a peeler, then roll and secure ends with some cream cheese. Place on cupcake along with mint leaves.

Carrot cupcakes with cream cheese frosting

Carrot cupcakes with cream cheese frosting Carrot cupcakes with cream cheese frosting Carrot cupcakes with cream cheese frosting Carrot cupcakes with cream cheese frosting
Easter cupcakes recipe Easter cupcakes recipe  Easter cupcakes recipe  Easter cupcakes recipe 
If you enjoyed reading my posts, LIKE me on Facebook! You can also follow me on Instagram (@babysumo) for more photo updates or subscribe to our YouTube channel. Thanks :)

Friday, April 10, 2020

Recipe: No-Knead Hot Cross Buns

Happy Good Friday guys! I'm grateful that I can be home with my family at this time, and to be able to make these hot cross buns for them to enjoy.

No-knead hot cross buns recipe


I was immediately drawn to this recipe since it's been described as the easiest hot cross buns ever as it is no-knead and just requires a few minutes to mix all the ingredients together before allowing the dough to rise. Since we're under quarantine here, I made do with whatever ingredients I had; I substituted bread flour with all-purpose flour so I found the dough a little stickier than usual when we were shaping it, but nothing an extra few tablespoonfuls of flour can't solve. I also used lemon zest instead of orange zest (MCO problems) and glazed the finish product with honey.

I was super happy with how the hot cross buns turned out though - absolutely beautiful and fluffy. Best eaten warm with a slathering of salted butter.

The buns stayed surprisingly soft, even on the next day. However, you may opt to lightly warm or toast them before serving.

No-knead hot cross buns recipe


Do visit Nagi's site for helpful tips, videos and step-by-step photo instructions as well as the original recipe. There is also a version which require kneading, which stay softer for even longer. Thanks for the recipe, it's a keeper!

No-knead hot cross buns recipe


No-Knead Hot Cross Buns
Recipe by Baby Sumo, adapted from RecipeTinEats
Preparation time: 15 minutes (+3 hours waiting time)
Cooking time: 22 minutes
Makes 12


Ingredients
1 tbsp instant yeast
1/2 cup caster sugar
1/2 cup warm water
1 cup whole milk, lukewarm
4 cups all-purpose flour + extra for dusting
2 tsp ground cinnamon
2 tsp mixed spice
1/2 tsp salt
Zest of 1 lemon
100g raisins or sultanas
50g butter, melted and cooled
2 eggs, at room temperature, beaten

For the crosses:
1/2 cup plain flour
5 tbsp water

For the glaze:
1 tbsp honey
1 tsp boiling water


1. Place the yeast and 2 teaspoons of sugar in a bowl, then add the water. Leave for 5 minutes until  frothy.
Frothy Instant Yeast


2. Place flour, remaining sugar, salt, ground cinnamon, and mixed spice in a mixing bowl. Whisk to combine.

3. Make a well in the centre, and add the eggs, melted butter, lukewarm milk, lemon zest and the liquid yeast, including all froth.

4. Mix until combined, it will be like a thick muffin batter. Cover the bowl with a wet tea towel and place in a warm place to rise, about 1 1/2 to 2 hours. The dough will triple in size and be bubbly on the surface.

Before rise
No-knead hot cross buns recipe using all-purpose flour


5. Line a 9" x 13" baking tray with baking paper, with overhang.

6. Punch dough to deflate. Dust work surface with flour and pour the dough out. Dust the top of the dough then knead lightly to deflate air and shape into a log. If you find the dough sticky and difficult to work with, then add more flour, a little at a time until you get a workable dough.

No-knead hot cross buns recipe using all-purpose flour


7. Divide into 12 equal piece and roll each piece to form a ball. Place the ball on the tray, and repeat with remaining dough, spacing them about 1cm apart on the tray. Line them up 4 by 3.

No-knead hot cross buns recipe using all-purpose flour


8. Lightly oil a cling wrap, then place over the tray. Return tray to a warm place and leave for 45 min- 1 hour, until the dough has risen by about 75% (less than double in size).

9. Preheat oven to 180°C (no fan).

10. For the crosses, mix flour and water until a runny paste forms. Spoon into a piping bag and snip a small hole in the corner (about 3mm). Remove cling wrap and pipe crosses onto the buns.

No-knead hot cross buns recipe using all-purpose flour

No-knead hot cross buns recipe using all-purpose flour


11. Place in preheated oven and bake for 22 minutes, or until the surface is a deep golden brown. Remove buns from oven.

12. Mix honey with boiling hot water. Brush the buns with the honey mixture while still warm.

13. Use overhang to lift buns onto a cooling rack. Allow to cool, for at least 20 minutes before serving. Serve with salted butter.

14. Store any uneaten hot cross buns in an airtight container. Cut in half and warm in a toaster before eating.

No-knead Hot cross buns recipe No-knead Hot cross buns recipe No-knead Hot cross buns recipe No-knead Hot cross buns recipe No-knead Hot cross buns recipe No-knead Hot cross buns recipe


No-knead hot cross buns recipe using all-purpose flour

No-knead hot cross buns recipe


If you enjoyed reading my posts, LIKE me on Facebook! You can also follow me on Instagram (@babysumo) for more photo updates or subscribe to our YouTube channel. Thanks :)

Wednesday, January 1, 2020

How to Make Year of the Rat Pineapple Tarts

Happy New Year guys! Wishing you all a blessed 2020 filled with love, happiness and good health.

This year, we welcome the Year of the Rat and I can't wait to share with you this video and short recipe on how to make these adorable Rat Pineapple Tarts. For the pineapple tart dough, I used my trusted pineapple nastar roll recipe which I have been using for the past 5 years. Buttery and delicious and super cute too!


Year of the Rat Pineapple Tarts: Step-by-Step Video


How to Make Year of the Rat Pineapple Tarts
Recipe by Baby Sumo

For every rat, you need:
8g dough (recipe here)
7g pineapple jam
2 almond flakes
2 black sesame seed
Extra almond for tail


1. Roll pineapple jam into oval shape.

2. Place pineapple jam on dough and bring the dough up around it to enclose. (see video)

3. Shape so that it is slightly tapered at the front (this will be the "face" side)

4. Place almond flakes/ slivers about 1/3 from the front (for the ears). Ensure that the smaller side of the almond is facing the top.

5. Use tweezers to place black sesame seeds on the face (for the eyes).

6. Take an almond flake and cut lengthwise into three strips. Use one as the rat's tail.

7. Bake in preheated oven (170C - no fan) for 18 minutes. Remove and allow to cool on wire rack before storing. These taste best the following day.

Happy baking! Please refer to the video if you are unsure about any of the steps listed above.


If you enjoyed reading my posts, LIKE me on Facebook! You can also follow me on Instagram (@babysumo) for more photo updates or subscribe to our YouTube channel. Thanks :)

Thursday, January 31, 2019

Recipe: Cute Piggy German Cookies for CNY

Let's welcome the Year of the Pig with these cute Piggy German Cookies. These adorable piggies are made using the basic German cookie recipe, with the help of some pink food colouring and black sesame feeds to complete the pig features. These will surely put a smile on everyone's face!


Oink oink!


Lovely melt-in-the-mouth piggy German Cookies


Step-by-step instructions on my YouTube. Click to view!


Cute Piggy German Cookies for CNY
Recipe by Baby Sumo
Preparation time: 45 mins - 1 hour + (depending on how skilled you are)
Cooking time: 18 minutes (per batch)
Makes about 75

Ingredients
250g butter, softened at room temperature
80g icing sugar, sifted
250g potato starch/flour, sifted
160g plain flour, sifted


For the pig features
Black sesame (for eyes)
Pink food colouring


1. Preheat oven to 170°C (no fan). Line two baking trays with greaseproof paper.

2. Using an electric mixer, cream the butter and icing sugar until light and fluffy, about 5 minutes.

3. Add the potato starch and plain flour, and mix to form a soft dough. If it feels sticky, add another 1 to 2 tablespoon of potato flour. You should be able to pinch some off with your fingers and roll into a ball easily.

4. Set aside 80g of dough and add about 3 drops of pink food colouring and mix well. This is for the snout and ears.


5. Roll the normal dough into a small ball, and shape into an oval.  Pinch some of the pink dough and shape into a small oval for the snout. Using the toothpick, poke two holes for the snout.

6. Shape two small triangles from the pink dough for the ears. Place ears on the side of the head.


7. Place two black sesame between the ears, above the snout for the eyes. 


8. Bake in preheated oven for 18 mins. Allow to cool on baking tray and store in an air tight container once cooled.


Note: If you do not wish to use all the above dough to make piggy German Cookies, you can use them to make the normal German cookies (see instructions here). This is a pink marbled version... kinda pretty, isn't it? (use 75% normal dough, 25% pink dough and roll into balls)


If you enjoyed reading my posts, LIKE me on Facebook! You can also follow me on Instagram (@babysumo) for more photo updates or subscribe to our YouTube channel. Thanks :)

Friday, February 23, 2018

Recipe: Easy Sugar-Free Banana Muffins (Baking with Kids)

So, we recently harvested not one, but TWO hands of bananas from our garden... which left us with a whole load of bananas ripening at the same time! 

Since it's the school holidays, I decided to get the kids into the kitchen and make some banana muffins together. This recipe has been adapted from Nigella Lawson's How to be a Domestic Goddess cookbook - it's a stir and bake recipe; super easy and quick and perfect for kids! Furthermore, no sugar is added into this bake, making this a healthy teatime treat!


Easy sugar-free banana muffins


Please enjoy this short video starring BabySumoKids...it's great seeing them so confident in the kitchen! If you'd like to see more videos from us (especially from the kids), do support us by subscribing to our YouTube channel and liking our videos. Thank you! :)


Easy Sugar-Free Banana Muffins
Recipe by Baby Sumo
Preparation time: 15 minutes
Cooking time: 25 minutes
Makes 12-13

Ingredients
60g salted butter
2 tbsp honey
1 tsp vanilla bean paste or extract
12 small ripe bananas
2 cups plain flour
2 tsp baking powder
1 tsp baking soda
1 tsp cinnamon
A pinch of salt


1. Preheat oven to 190°C (no fan).

2. In a saucepan over medium low heat, melt the butter. Once melted, add the honey and vanilla bean paste and mix well. Leave to cool for 5-10 minutes.

3. Peel and mash the bananas using a masher. Add the butter mixture from Step 2 to the mashed bananas and mix well.

4. In another bowl, mix the plain flour with baking powder, baking soda, cinnamon and salt.

5. Add dry ingredients (from Step 4) into the wet ingredients (Step 3) and fold gently until the ingredients are just mixed. Do not overmix.

6. Fill the paper cups until they are about 2/3 full and place into a muffin tray.


7. Place muffin tray into preheated oven and bake for 25 minutes. Leave in the pan to cool for 5 minutes, then remove to a wire rack and cool for another 10 minutes.

Note: We used pisang mas (small bananas), which you can substitute with 4 large ripe bananas.


If you enjoyed reading my posts, LIKE me on Facebook! You can also follow me on Instagram (@babysumo) for more photo updates. Thanks :)
Related Posts Plugin for WordPress, Blogger...