Showing posts with label Recipe Vlogs. Show all posts

Monday, June 10, 2024

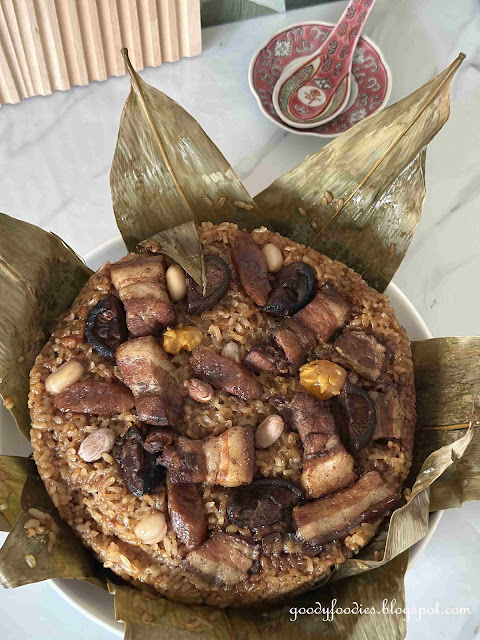
Recipe: No-Wrap Hokkien Bak Chang 肉粽 (Glutinous Rice Dumpling)

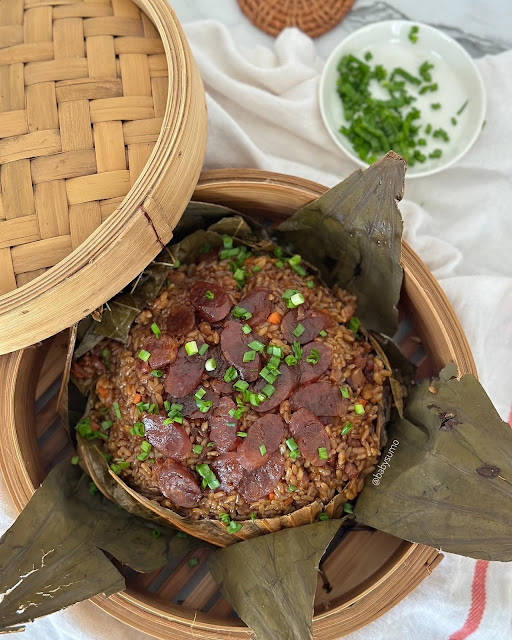
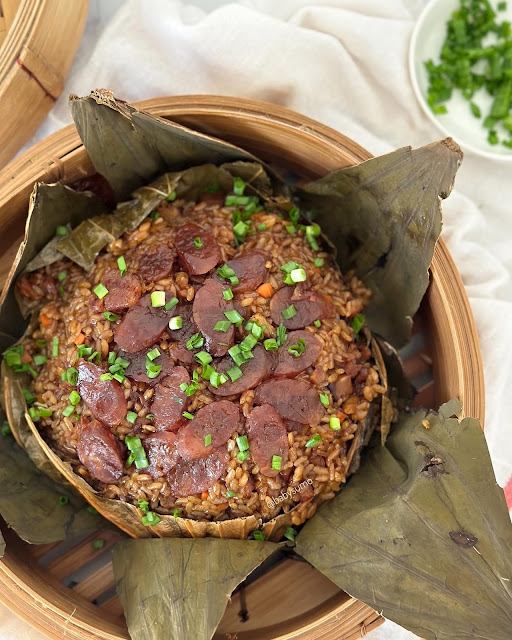
Dragon Boat Festival is finally here, and during this festival, glutinous rice dumplings, also known as zongzi 粽子 or bak chang 肉粽 is a must-have. If wrapping these rice dumplings is not your forte, you would love this No-Wrap Hokkien Bak Chang recipe I am about to share. Not to mention how much quicker and time-saving this recipe is compared to the traditional wrapping method. 


In this No-Wrap Hokkien Bak Chang, you will still find all the usual suspects; the flavourful, sticky glutinous rice, gelatinous pork belly, creamy chestnuts, peanuts, Chinese mushrooms, salted egg yolk and Chinese sausage (lap cheong). A cake pan with a removable base is lined with bamboo leaves, then all the ingredients are layered in the pan and then steamed for 2 hours (3 - 4 hours if you prefer a softer consistency like your regular zongzi).


Wishing everyone a Happy Duanwu Jie!

You can buy all the dried ingredients here:
Italian dried chestnuts: https://s.shopee.com.my/4VHCMME9Tf
Bamboo leaves: https://s.shopee.com.my/9UfsIYG2NQ
Dried shrimp: https://shope.ee/2fnbGZmXGk
Pearl glutinous rice: https://shope.ee/4Uxm5mwqo4
White flower mushroom: https://shope.ee/A9ijTzj0GO
Chinese sausage: https://shope.ee/8pIGZOGADO
Shandong peanuts: https://shope.ee/10cHr0eM9p


Step-by-step instructions on how to make this easy No-Wrap Hokkien Bak Chang


𝐍𝐨-𝐖𝐫𝐚𝐩 𝐇𝐨𝐤𝐤𝐢𝐞𝐧 𝐁𝐚𝐤 𝐂𝐡𝐚𝐧𝐠
Recipe by Baby Sumo 
Preparation time: 1 hour
Cooking time: 3-4 hours
Recipe makes  2 No-wrap Bak chang (each one serves 6 pax) OR 1 no-wrap bak chang + 10 traditional wrapped ones

Ingredients
1kg pearl glutinous rice
24 bamboo leaves (150g)
12-14 Chinese mushrooms
60g peanuts
18-20 dried chestnuts
50g dried shrimp
50g shallots
2 Chinese sausage
1 tbsp dark soy sauce
4 tbsp cooking oil
4 salted egg yolks, cut into quarters

Pork belly:
400g pork belly, marinate with:
1 tbsp light soy sauce
1 tbsp Shaoxing wine
1tbsp  oyster sauce
1 tsp salt
1/2 tsp five spice powder
1/2 tsp white pepper
1 tsp sugar
1/2 tsp garlic powder

Rice seasoning:
2 tbsp dark soy sauce
1 tbsp oyster sauce
2 tbsp light soy sauce
1 tsp salt
1 tsp five spice powder
1/2 tsp white pepper

1 cup dried shrimp soaking water
2-3 cups mushroom soaking water

Day 1 (evening)
1. Soak bamboo leaves in cold water for at least 12 hrs. Rinse and clean each leaf before use.

2. Soak glutinous rice with 1 tsp salt and water overnight. Rinse 3-4 times, then drain.

3. Soak mushrooms overnight in 2-3 cups water. Remove stalks. Cut in half if too large. Reserve soaking water.

Day 2
1.Soak peanut, dried chestnut and dried shrimp for at least 4 hours.

2. Cut pork belly into 1.5cm pieces. Marinate with seasoning for at least 4 hours.

3. Heat 1tbsp oil in pan. Brown pork belly. Once browned, add 1/2 cup water and simmer for 20 mins. Add mushroom and another 1/2 cup water and simmer for further 20 mins. Add dark soy sauce. Stir well, remove and set aside.

4. Remove casing from Chinese sausage (lap cheong).Cut at an angle into 1/2 cm thick slices. Heat 1 tbsp oil in pan. Saute Chinese sausage for 3-4 mins until fragrant. Remove and set aside. 

5. Boil peanuts for 1 hour. Boil chestnuts for 20 mins.

6. Heat 3T oil in wok. Saute shallots until golden brown. Saute roughly chopped dried shrimp for 4-5 mins. Add rice, seasoning and 1 cup dried shrimp soaking water and 2 cup mushroom soaking water. Mix well and cook until liquid has been fully absorbed.

Assembling the No-Wrap Bak Chang:
1. Line a 20-cm cake pan with removable base with 5-6 bamboo leaves. Fill half the pan with rice and compact using the back of a spoon. Add filling (peanuts, chestnuts, Chinese sausage, pork belly, mushroom, salted egg yolk). Repeat and top with more rice, and filling.


2. Fold down the excess leaves, using it to cover the rice, then hold down using a small plate.

3. Steam over high heat for a minimum of 2 hours. If you want your rice to be softer like the traditional zongzi, then do not need to cover the top of the rice when steaming, and you can also steam for longer (3-4 hours).

4. Cool for 15 mins. Place cake pan on top of a tall glass, then slide down to remove the bak chang. Slice into 6-8 portions and enjoy! Any unfinished bak chang can be stored in the fridge for up to 5 days. To reheat the leftover bak chang, steam for 10 mins over high heat. 


If you enjoyed reading my posts, LIKE me on Facebook! You can also follow me on Instagram (@babysumo) for more photo updates or subscribe to our YouTube channel. Thanks :)

Sunday, April 28, 2024

Recipe: Stir Fried Snakehead Fish with Ginger & Spring Onion

Snakehead Fish, also known as 生鱼 (sang yu) in Chinese or ikan haruan / toman in Malay is such an underrated fish. I personally love it cos it has no fishy smell and the flesh is so tender. It’s nice in porridge, steamed or stir fried like you see here with ginger and spring onions. Such a nice and easy recipe, cooks in under 15 minutes.


I bought the frozen slices from the supermarket, a 500g pack will yield 350g snakehead fish slices after defrosting.


𝐒𝐭𝐢𝐫 𝐅𝐫𝐢𝐞𝐝 𝐒𝐧𝐚𝐤𝐞𝐡𝐞𝐚𝐝 𝐅𝐢𝐬𝐡 𝐒𝐥𝐢𝐜𝐞𝐬 𝐰𝐢𝐭𝐡 𝐆𝐢𝐧𝐠𝐞𝐫 & 𝐒𝐩𝐫𝐢𝐧𝐠 𝐎𝐧𝐢𝐨𝐧
Recipe by Baby Sumo
Preparation time: 10 mins
Cooking time: 10 mins
Serves 3

Ingredients
350g snakehead fish slices
4 slice old ginger
2 cloves garlic, finely chopped
2 tbsp cooking oil
1 tbsp grated ginger
1-2 tbsp Shaoxing wine
1 tsp chicken stock powder
A few dashes white pepper
20g spring onion, cut into 1” lengths

1. Heat oil in wok over medium heat. Add garlic, ginger slices and grated ginger and saute for 2-3 mins until lightly golden and fragrant.

2. Add fish slices and saute for 2-3 mins, then season with Shaoxing wine, chicken stock powder and white pepper. Cook until fish flesh has turned white and opaque. Then, add spring onions and cook for a further minute. Serve with rice.


If you enjoyed reading my posts, LIKE me on Facebook! You can also follow me on Instagram (@babysumo) for more photo updates or subscribe to our YouTube channel. Thanks :)

Thursday, April 18, 2024

Recipe: Ayam Masak Merah

𝐀𝐲𝐚𝐦 𝐌𝐚𝐬𝐚𝐤 𝐌𝐞𝐫𝐚𝐡, translated as red cooked chicken, is a Malay dish whereby chicken is cooked with chilli paste (cili giling) and tomato puree. I usually make it with chicken fillet or chicken breast cos they cook quicker (and that's the cut my family likes eating). You can serve it with Nasi tomato and acar jelatah.. super yum!


Check out this YouTube video for step-by-step instructions on cooking ayam masak merah:


𝐀𝐲𝐚𝐦 𝐌𝐚𝐬𝐚𝐤 𝐌𝐞𝐫𝐚𝐡
Recipe by Baby Sumo
Preparation time: 10 mins
Cooking time: 30 mins
Serves 4

Ingredients
400g chicken fillet or breast, cut into large chunks
1/2 tsp turmeric powder
1/4 tsp salt
2 tbsp cooking oil
2 tbsp cili giling
1 tsp chicken stock powder
1 tbsp sugar
1/2 cup Cirio finely chopped tomatoes / tomato puree
1/2 yellow onion
1 tomato, cut into 8
1/4 cup frozen peas
1 cinnamon stick
1 star anise
2 cardamom pods

To blend
3 cloves garlic
2 shallots
1/2 yellow onion
2 tbsp water

1. Marinate chicken with turmeric and salt for 10 minutes.

2. Place ingredients to blend in a blender or mini food chopper and blend until you get a fine paste. 

3. In a wok, heat oil. Add chicken and cook for 4-5 mins, until no longer pink and evenly browned on all sides. Remove and set aside.

4. Add cinnamon stick, star anise and cardamom pods and saute for 2 mins until fragrant. Add blended ingredients from (2) and saute for 4-5 mins. Add cili giling and saute for further 2-3 mins.

5. Add tomato puree / finely chopped tomatoes and season with sugar and chicken stock powder. Return cooked chicken back to wok and add onions, tomato and frozen peas. Cook for another 8-10 mins, until sauce has thickened. Serve with nasi tomato or nasi minyak, along with acar jelatah.


If you enjoyed reading my posts, LIKE me on Facebook! You can also follow me on Instagram (@babysumo) for more photo updates or subscribe to our YouTube channel.Thanks :)

Friday, April 5, 2024

Recipe: Fried Beancurd Roll (Dim Sum)

These 𝐅𝐫𝐢𝐞𝐝 𝐁𝐞𝐚𝐧𝐜𝐮𝐫𝐝 𝐑𝐨𝐥𝐥𝐬 are something we always order at the dim sum restaurant. Tried my hand at making them at home last weekend in the air fryer and they turned out amazing! The filling is a mix of store bought fish paste, chopped prawns and chives. If you don’t have an air fryer, you can shallow fry them in oil (180°C) for a few mins until golden.


Watch the step-by-step instruction video here:

You can buy the beancurd sheet here: https://shope.ee/9A1ZFVfMVU

𝐅𝐫𝐢𝐞𝐝 𝐁𝐞𝐚𝐧𝐜𝐮𝐫𝐝 𝐑𝐨𝐥𝐥𝐬
Recipe by Baby Sumo
Preparation time: 20-30 mins
Cooking time: 20 mins
Makes 7-8

Ingredients
18g beancurd sheet, cut into 15x15cm sheets (7-8 pcs)
Cooking spray

For the filling
200g premium fish paste
10g chives
4 peeled prawns

For the glue
1 tbsp cornstarch
1 tbsp water

For the mayo dipping sauce
1 tbsp mayonnaise
1 tbsp evaporated creamer
1 tsp honey


1. In a bowl, mix the ingredients for the filling. Then, slap the ingredients into the bowl for about 5 mins, until the filling is sticky and bouncy.

2. Make the glue by mixing the ingredients together. Set aside.

3. Place one beancurd sheet on a flat surface. Using a damp cloth, wipe the beancurd sheet on both sides (wipe at least 2-3 times to remove excess salt. Wiping it will also make it more pliable). Place about one tablespoonful of filling onto the sheet, about 1 cm from the sides and 2cm from bottom. Fold the bottom upwards. Using your fingers, apply glue around the edges and then fold to form a parcel. (watch video here to learn how to fold the rolls). Repeat for other sheets until filling is used up.

4. Spray air fryer with some cooking spray. Place beancurd rolls in a single layer in air fryer, then spray again with more cooking spray. Cook in air fryer at 180°C for 20 mins until beancurd is crispy.

5. Meanwhile, place all ingredients for dipping sauce in a bowl and mix well.

6. Serve the beancurd rolls hot with the mayo dipping sauce. We usually cut each roll into half with scissors.

Tip: Make sure to wipe the beancurd sheets a few times to remove excess salt from the sheets, otherwise it will be very salty.


If you enjoyed reading my posts, LIKE me on Facebook! You can also follow me on Instagram (@babysumo) for more photo updates or subscribe to our YouTube channel. Thanks :)
Thursday, March 28, 2024

Recipe: Kuey Teow Ladna

𝐊𝐮𝐞𝐲 𝐓𝐞𝐨𝐰 𝐋𝐚𝐝𝐧𝐚 is the Thai equivalent of Cantonese wat tan hor. Ladna in Thai language means “pour on the face” which means the noodles are first cooked then egg gravy is poured on top.

This noodle dish is made using thick kuey teow noodles along with your choice of prawns, squid, chicken and fish cake. The main difference I could see with Cantonese wat tan hor is that kuey teow Ladna usually has carrots and chilli. Do enlighten me if there are any other ingredients I have missed.


Check out the step-by-step video instructions on YouTube:


𝐊𝐮𝐞𝐲 𝐓𝐞𝐨𝐰 𝐋𝐚𝐝𝐧𝐚
Recipe by Baby Sumo
Preparation time: 10 mins
Cooking time: 10-15 mins
Serves 2-3

Ingredients
2 tbsp cooking oil
2 cloves garlic, finely chopped
6-8 prawns
2 fish cake, sliced
150g bok choy or choy sum, sliced
1/3 carrot, cut into matchsticks
1/3 red chilli, sliced

For the noodles
1 pack (450g) thick kuey teow, strands loosened
1 tbsp cooking oil
1 tbsp dark soy sauce
1 tbsp light soy sauce

For the sauce
600ml boiling water
1 tbsp chicken stock concentrate
1 tbsp oyster sauce
1 1/2 tbsp cornstarch mixed with 3 tbsp water
2 eggs
1/2 tsp light soy sauce
A dash of white pepper


1. In a wok, heat oil and add dark soy sauce and light soy sauce. Then, add noodles and stir to coat well with sauce. Cook for a few mins until noodles are cooked through. Divide noodles on two to three plates (depending on how many servings you are making).

2. In the same wok, heat 1 tablespoon of oil over high heat. Add the prawns and cooked for 2-3 mins, until cooked through. Remove and set aside.

3. Beat eggs with 1/2 tsp of light soy sauce and a dash of white pepper.

4. In the same wok, heat 1 tablespoon of oil over high heat. Then, add the garlic and saute for 1 minute, until lightly browned. Then, add the water and chicken stock concentrate. Add fish cake, carrot, oyster sauce and bok choy. Return cooked prawns to wok. Then, add cornstarch slurry to thicken sauce. Finally, lower heat, and add the eggs and stir to form egg strands. Add red chilli.

5. Divide sauce between the plates and serve immediately. 


If you enjoyed reading my posts, LIKE me on Facebook! You can also follow me on Instagram (@babysumo) for more photo updates or subscribe to our YouTube channel. Thanks :)

Saturday, March 23, 2024

Recipe: Ma Yi Shang Shu 蚂蚁上树 (Ants Climbing a Tree)

𝐌𝐚 𝐘𝐢 𝐒𝐡𝐚𝐧𝐠 𝐒𝐡𝐮 蚂蚁上树 literally translated as “Ants Climbing a Tree”. Don’t worry, no ants were hurt in the making of this dish. It’s actually a classic Sichuan dish containing glass noodles which is supposed to resemble a tree, minced pork for the ants and spring onions for the leaves on a tree. Haha I don’t see the resemblance at all but hey it’s a delicious dish. 


It's slightly spicy from the doubanjiang (chilli bean sauce), the same sauce used to make mapo tofu. Very flavorful, and makes a quick lovely lunch/dinner meal.

Check out the step-by-step recipe video here
(click on this link to watch on YouTube):


This is brand of glass noodles brand that I use, very nice texture. Buy here: https://shope.ee/1ffRrsNG64

𝐌𝐚 𝐘𝐢 𝐒𝐡𝐚𝐧𝐠 𝐒𝐡𝐮 蚂蚁上树
Recipe by Baby Sumo
Preparation time: 5 mins
Cooking time: 10 mins
Serves 1

Ingredients
50g glass noodles (1 piece), soaked in hot water for 5 mins
60g minced pork
1/2 cup water
2 cloves garlic
1 tsp grated ginger
1 tbsp cooking oil
3 stalks spring onion, finely chopped

Seasoning
1 tsp doubanjiang (chilli bean sauce)
1 tsp light soy sauce
1/2 tsp dark soy sauce
1/2 tsp sugar
1/4 tsp chicken stock powder

For marinating the pork
1/2 tsp light soy sauce
1/2 tsp Shaoxing wine
White pepper

1.  Marinate pork for 5-10 mins.

2. In a pan or wok, heat oil over medium high heat. Add garlic and ginger, and saute for 2 mins, until lightly golden. Add pork and brown. Then, add seasoning and water, cook for a few mins until sauce has been absorbed into the noodles. Add spring onions and give it a quick stir. 

Ma Yi Shang Shu


If you enjoyed reading my posts, LIKE me on Facebook! You can also follow me on Instagram (@babysumo) for more photo updates or subscribe to our YouTube channel. Thanks :)

Monday, March 11, 2024

Recipe: Thai-style Steamed Fish with Lime Juice & Garlic

If you love Thai-style 𝐒𝐭𝐞𝐚𝐦𝐞𝐝 𝐅𝐢𝐬𝐡 𝐰𝐢𝐭𝐡 𝐋𝐢𝐦𝐞 𝐉𝐮𝐢𝐜𝐞 & 𝐆𝐚𝐫𝐥𝐢𝐜 aka Pla Kapong Neung Manao ปลากะพงนึ่งมะนาว , you can try recreating it at home at a fraction of restaurant prices. The best fish to use for this dish would be siakap, also known as barramundi / Asian seabass which you can get easily in Malaysia. The sauce should be a balance of spicy, sweet and sour flavours 😋 Easy, delicious and appetising!

Also, I'm taking this opportunity to wish all my Muslim friends Happy Fasting and have a blessed Ramadan month.


Check out the full video here on YouTube:


𝐒𝐭𝐞𝐚𝐦𝐞𝐝 𝐅𝐢𝐬𝐡 𝐰𝐢𝐭𝐡 𝐋𝐢𝐦𝐞 𝐉𝐮𝐢𝐜𝐞 & 𝐆𝐚𝐫𝐥𝐢𝐜
Recipe by Baby Sumo
Preparation time: 10 minutes
Cooking time: 10 minutes
Serves 3-4


Ingredients
500g siakap fish (barramundi), cleaned and gutted
1 stalk lemongrass, bruised
6 stalks coriander, separate leaves and stalks

For the lime sauce
1/2 cup hot water
1 tsp chicken stock powder
2 tbsp brown or palm sugar
2 red cili padi
5 cloves garlic
3 tbsp lime juice
1 tbsp fish sauce


1. To make sauce, first pour boiling water into a measuring jug, then dissolve the chicken stock powder and sugar. Then, add rest of the ingredients and mix well. The sauce should be sour, slightly spicy and sweet - adjust seasoning to your liking, using more lime juice, cili padi or sugar.

2. Pat the fish dry with a kitchen towel. Score the fish three times on both sides. Stuff the cavity of the fish the lemongrass. Place fish on a heatproof plate. Steam on high heat for 10 minutes.

3 . Place coriander stalks on side of the fish. Pour sauce over the fish. Then, garnish with coriander and serve.


If you enjoyed reading my posts, LIKE me on Facebook! You can also follow me on Instagram (@babysumo) for more photo updates or subscribe to our YouTube channel. Thanks :)

Wednesday, August 16, 2023

Recipe: Hor Yip Fan (Lotus Leaf Wrapped Rice)

You've probably come across this dish, Hor Yip Fan (Lotus Leaf Wrapped Rice) at a wedding banquet dinner or a celebratory Chinese New Year meal. We always make sure we have some tummy space left at the end of the 9-course meal to enjoy this.

Hor Yip Fan


Now, you don't have to wait for CNY or wedding banquets to come around to enjoy this. Glutinous rice, along with dried shrimp, Chinese sausage, mushroom and carrots are wrapped in lotus leaf and steamed. The lotus leaf lends a lovely aroma to the dish. Fragrant and flavourful, it’s hard to stop at one bowl.

Hor Yip Fan (Lotus Leaf Wrapped Rice)


I'm using pearl glutinous rice which holds it shape even after steaming; soft individual grains. It is best to soak two leaves and overlap them to cover any gaps/holes you find.

Buy dried ingredients here:
Pearl glutinous rice: https://shope.ee/5AP36XdB6h
Lotus leaf: https://shope.ee/6fDqt9tBQu
Chinese sausage: https://shope.ee/8pIGZOGADO
Dried shrimp: https://shope.ee/10QSCWntoH
Dried Chinese mushroom: https://shope.ee/A9ijTzj0GO


Step-by-step YouTube recipe video here:


Hor Yip Fan (Lotus Leaf Wrapped Rice)
Recipe by Baby Sumo
Preparation time: 15-20 mins
Cooking time: 1 hour
Serves 4


Ingredients
1 pair Chinese sausage
1 cup pearl rice glutinous, soaked for 6 hours
25g dried shrimp
6 dried mushrooms, soaked for 2 hours
1 carrot, peeled and diced
Spring onion
2 dried lotus leaves
1 shallot
2 cloves garlic
3T cooking oil


Seasoning
1 1/2T light soy sauce
1T oyster sauce
1 tsp dark soy sauce
1/4 tsp white pepper
1T Shaoxing wine


1. Place Chinese sausage on a heatproof plate, then pour boiling water over it. Leave for 5 mins, then peel off the skin from the sausage. Slice one sausage thinly at an angle. Dice the other sausage.
 
2. Rinse and soak lotus leaves for 1 hour. Bring water to boil in a wok. Boil leaves for 5 mins, until they are pliable. Remove and set aside to cool.


3. Soak dried shrimp in 1/2 cup water for 2 hours. Drain and reserve the soaking water.
Heat 1T oil in wok/pan. Add the sliced Chinese sausage and sauté for 2 mins until fragrant. Remove and set aside.

4. Add remaining oil. Once hot, add the shallot and garlic, and sauté for 2 mins until lightly golden. Then, add dried shrimp and diced Chinese sausage and sauté for further 2 mins. Next, add the carrot and Chinese mushroom and sauté for further 2 mins.

5. Drain rice and add to the wok, stirring well to coat. Then add seasoning and reserved (1/2 cup) dried shrimp soaking water and mix well. Cook until water has been absorbed, about 4-5 mins.

6. Line a deep bowl with lotus leaf, overlapping to cover any holes/ gaps. Lightly brush with some oil.
Arrange sliced Chinese sausage in the centre, then fill with rice mixture. Press down using a spoon to compact. Fold leaves in to form a parcel.

7. Invert parcel onto a steamer basket or heatproof plate. Place in your steamer (or wok filled with water and steamer rack) and steam over high heat for 45 mins. Do check occasionally and top up your steamer with boiling water so it doesn’t dry out.

8. Turn heat off and allow to cool for 10 mins, then cut open and serve. You can cut it in this star shape for a more attractive presentation. 


Hor Yip Fan (Lotus Leaf Wrapped Rice)

Hor Yip Fan (Lotus Leaf Wrapped Rice)

If you enjoyed reading my posts, LIKE me on Facebook! You can also follow me on Instagram (@babysumo) for more photo updates or subscribe to our YouTube channel. Thanks :)

Monday, February 13, 2023

Recipe: Mushroom Risotto

Say I love you on Valentine’s Day, with a heartwarming bowl of risotto cooked with love. This meatless risotto recipe is made this using king oyster mushroom and vegetable stock. King oyster mushrooms have a nice meat-like texture and also lots of umami flavours.

This is a very simple recipe you can prepare at home; a very pleasing, delicious Valentine's meal with minimum effort. ;)


Check out the reels here:


Mushroom Risotto
Recipe by Baby Sumo
Preparation time: 5 mins
Cooking time: 25-30 mins
Serves 4

Ingredients
250g arborio rice
1 yellow onion, finely chopped
2 tbsp olive oil
2 tbsp salted butter
1.2l vegetable stock
30g freshly grated Parmiagiano Reggiano, plus extra for garnishing
2 tsp chopped chives

For the mushroom
2T olive oil
2T salted butter
200g king oyster mushroom
2 tsp mushroom seasoning

1. Cut about 1.5 inch from the top of the mushrooms and thinly slice. Cube the rest of the mushrooms.


2. Heat 1 tbsp oil and 1 tbsp butter and sauté the cubed mushrooms for 4-5 mins, then season with mushroom seasoning. Repeat with sliced mushroom, cooking until they’re browned around the edges.

3. Heat oil and 1 tbsp butter in a pan. Sauté onions for 2 mins. Add arborio and toast for a min, until the rice is crackling. Add stock, about 200ml at a time, and stir occasionally to massage out the starch from the rice. Cook for about 20-25 mins, until rice is al dente.

4. Stir in cubed mushrooms to the risotto. At this point, your risotto should still be a little soupy (not too dry). Stir in Parmesan and 1tablespoon of butter. Your risotto should be creamy now.


5. Serve risotto with sliced mushrooms and chives. Grate more Parmesan if you like.


If you enjoyed reading my posts, LIKE me on Facebook! You can also follow me on Instagram (@babysumo) for more photo updates or subscribe to our YouTube channel. Thanks :)

Wednesday, January 11, 2023

Recipe: Year of the Rabbit Yee Sang

Every year, I look forward to creating and making the Chinese zodiac yee sang for the corresponding New Year. This year, we will be celebrating the Year of the Rabbit.

Presenting our Rabbit Yee Sang, made with fresh fruits and vegetables and topped with canned abalone as well as crushed peanuts, sesame seeds, pok chui crackers, and balsamic dressing. My design is inspired by Miffy (one of the very first soft toys my husband bought for my daughter when she was born). 


Watch the step-by-step video here:


Rabbit Yee Sang
Recipe by Baby Sumo
Preparation time: 30-45 mins
Serves 6-8

Ingredients
A few lettuce leaves, sliced
1 white radish * (for face and ears)
1 Japanese cucumber *
1 carrot *
1 century pear *
Canned pineapple, small cubes
6-8 strawberries
6-8 baby carrots
Roasted Seaweed (for mouth)
Blueberries (for eyes)

For topping
1/2 packet crushed peanuts
3-4 tbsp sesame seeds
1 packet pok chui crackers
Canned abalone in brine (buy here)


1. Peel and julienne ingredients marked with *. Cut strawberries into heart shapes and also two small ovals for the cheeks.
2. For the dressing: mix 4 tbsp olive oil, 2 tbsp white balsamic vinegar, 2 tbsp honey and salt.
3. Create the rabbit yee sang using the above ingredients (watch video for step-by-step instructions).


Tip:
✨ make the ears longer and rounder around the tips.
✨ use a julienne peeler, it will make your life much easier.


If you enjoyed reading my posts, LIKE me on Facebook! You can also follow me on Instagram (@babysumo) for more photo updates or subscribe to our YouTube channel. Thanks :)

Saturday, November 12, 2022

Recipe: Fu Chuk Yi Mai (Dried Beancurd with Barley & Gingko)

Making another one of my favourite tong sui (Chinese dessert soup)! This time, it's Fu Chuk Yi Mai Pak Kor, translated as Dried beancurd with barley and ginkgo. Super easy and super yummy!


I’m using Job’s tears also known as Chinese barley or Yi Yi ren 薏苡仁 which has more health benefits compared to regular barley. Job's tears is good for those who have high cholesterol or have eczema, congestion etc. Try this classic Chinese dessert today.


Check out the YouTube recipe video here:


Fu Chuk Yi Mai (Dried Beancurd with Barley & Gingko)
Recipe by Baby Sumo
Preparation time: 5 minutes
Cooking time: 1 hour to 1 hour 15 mins
Makes 8 servings

Ingredients
100g Job’s Tears / Chinese barley, rinsed
60g dried beancurd sheet (for dessert)
1.5l water
80g (40 pcs) peeled and ready to use ginkgo nuts
50g rock sugar
6 pandan leaves, rinsed and knotted

1. Soak beancurd sheets in tap water for 30 mins. Cut into 2” lengths using scissors. Drain and set aside.

2. Place water, pandan leaves and Job’s tears in a pot and bring to boil. Once boiling, simmer for 30 mins. Remove pandan leaves.

3. Add beancurd sheets and simmer for further 30-45 mins, until beancurd has disintegrated into smaller pieces.


4. Add rock sugar to taste. Add ginkgo and cook for further 5 mins. Ready to serve.


You can buy Job’s Tears (Chinese barley) here : https://shope.ee/q9QPKwxNp
You can buy dried beancurd sheet herehttps://shope.ee/4KjIZrYtHc

If you enjoyed reading my posts, LIKE me on Facebook! You can also follow me on Instagram (@babysumo) for more photo updates or subscribe to our YouTube channel. Thanks :)

Sunday, September 11, 2022

Recipe: Spaghetti Carbonara

The Unc was back for a short trip recently, and with him, he brought all the ingredients needed to make Pasta Carbonara for us. An authentic version is made using guanciale (cured pork cheek), pecorino romano and Parmigiano Reggiano with eggs (no cream!). For the pasta, we used spaghettoni (a thicker version of spaghetti).

Perfectly Al dente, rich and creamy.. loved it! Thanks to The Unc for making this for us :)


Spaghettoni Carbonara
Recipe by Baby Sumo
Preparation time: 10-15 minutes
Cooking time:20-25 minutes
Serves 6

Ingredients
600g spaghettoni (or spaghetti)
215g guanciale, crusts trimmed and sliced
3 eggs, plus 1 extra egg yolk
Freshly grated black pepper
215g pecorino cheese, grated
Parmigiano Reggiano

1. In a pot of salted water, cook the spaghettoni pasta for 16 mins, according to packet instruction.

2. In a pan, arrange guanciale and cook until fat is rendered and crispy. You may need to do this in two batches. Remove and set aside.


3. Beat eggs then add grated Pecorino romano and mix well.

4. Add freshly grated black pepper to hot oil. Then, add cooked pasta and 1 1/2 cup pasta water. Stir vigorously. Turn off heat. Add eggs and pecorino cheese and mix well until pasta is creamy. Add 3/4 of the guanciale back to the pasta.

5. Serve in individual plates and garnish with the remaining guanciale and generous shaving of Parmesan.

Watch the step-by-step video instructions here:


If you enjoyed reading my posts, LIKE me on Facebook! You can also follow me on Instagram (@babysumo) for more photo updates or subscribe to our YouTube channel. Thanks :)

Thursday, February 3, 2022

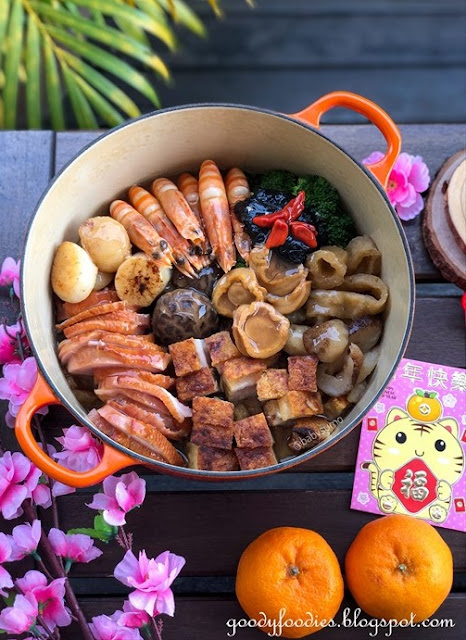
Recipe: Poon Choi (Pen Cai 盆菜)

Poon choi 盆菜, literally translated as basin dish, is a multi-layer dish commonly served during Chinese New Year.  It is traditionally served in large wooden, porcelain or metal basins called poon, for communal-style consumption.

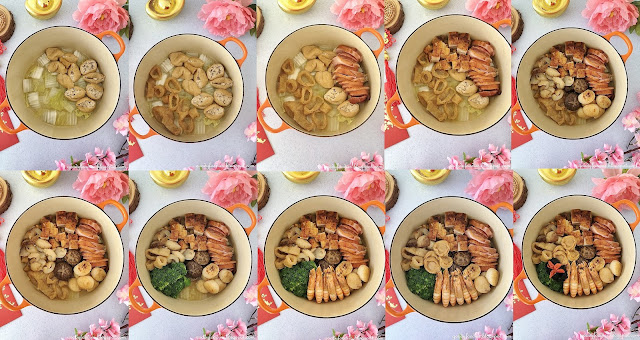
This year, I decided to put together a Poon Choi at home to enjoy together with my parents. There are no rules as to what you can put in a poon choi, but the bottom layer is usually braised Chinese cabbage and radish, followed by ingredients which absorbs sauces well and then the drier or more luxurious ingredients at the top. 

Poon choi recipe


Surprisingly, putting together a poon choi is not as time consuming or difficult as I imagined it to be. It took me less than 1 1/2 hours to cook and assemble this poon choi with 12 auspicious ingredients. For my poon choi, I used a 24cm cast iron round casserole pot. 

Poon choi as a whole symbolises unity, and each ingredient is carefully selected for its auspicious symbolism:

Chinese cabbage - 100 types of prosperity
Tofu pok - gold / wealth
Fish maw - abundance
Smoked duck - fertility
Roast pork (siew yoke) - strength
Chinese mushroom - completeness, family unity
Sea cucumber - happiness
Hokkaido scallops - new opportunities
Tiger prawns - Happiness and good fortune
Abalone - Definite good fortune
Fatt choy (black moss) - exceeding wealth
Broccoli - new beginnings
Goji - red colour signifies good luck


The whole family thoroughly enjoyed it! Very delicious, would not hesitate making this again next year for our Chinese New Year celebrations. Wishing you all a happy, healthy and prosperous Year of the Tiger!

Poon choi recipe


Poon Choi (Pen Cai 盆菜)
Recipe by Baby Sumo
Preparation time: 30-45 mins
Cooking time: 45 mins
Serves 6

Ingredients
For the Chinese cabbage
8 Chinese cabbage leaves
300ml water
1/2 tbsp chicken stock concentrate
A few dashes white pepper

Braising
6 tofu pok, cut in half
200g sea cucumber, cut at an angle, 1" thick
1 fish maw, soaked for 1 hour, then cut into 2cm lengths
6 Chinese mushrooms, rehydrated and stalks trimmed
2 tbsp vegetarian oyster sauce
1 tbsp light soy sauce
2-3 tbsp Shaoxing wine
A few dashes white pepper
1/2 tbsp chicken stock concentrate
700ml water
1 1/2 tbsp cornstarch
3 tbsp water

Other ingredients
1 smoked duck, about 200g
200-300g roast pork, store bought or homemade, cut into chunks
6 large Hokkaido scallops
6 tiger prawns, trimmed
1 - 2 cans abalone
6 broccoli florets
A handful fatt choy, rehydrated in boiling water for 2 mins
5 Goji berries, rehydrated in water


1. Chinese cabbage: Wash Chinese cabbage leaves and cut into half, then into 2" lengths. In a cast iron pot, bring water to the boil, then season with chicken stock concentrate and white pepper. Layer on the cabbage and simmer for 30 minutes. Steam brocolli florets for 3-4 mins, then remove. 

2. Braising: In a separate saucepan or pot, bring water to the boil, then season with oyster sauce, light soy sauce, Shaoxing wine, white pepper and chicken stock concentrate. Add the mushrooms and fish maw, and braise over low heat for 30 mins. After 30 mins, add the tofu pok and sea cucumber and braise for a further 15 mins. Remove all ingredients and set aside sauce. 

3. Smoked duck: Cook smoked duck in air fryer for 10 minutes at 200C. Remove and set aside to cool. Once cool, slice the duck. 

4. Roast pork: If roast pork is not freshly made, reheat in air fryer for 10 minutes at 160C. Increase heat to 200C and cook in air fryer for a further 10-15 minutes, until skin is crispy.  Set aside to cool, then cut into bite-sized chunks.

5. Prawns and scallops: Marinate prawns with 1/2 tsp Shaoxing wine, salt and pepper. In a frying pan, heat 1 tablespoon of oil at medium high heat. Add prawns and cook for 2 mins each side, until nice and crispy. Remove and set aside. Add a slice of butter to pan. Season scallops with salt, then sear on high heat for 2-3 mins, until cooked to your liking. Set aside. (Note: You can also stir fry or steam the scallops and prawns)

6. For the sauce: Heat sauce from Step 2 over medium heat. Mix constarch with water, then pour into the sauce to thicken, stirring frequently. Taste and season with more Shaoxing wine or soy sauce as necessary. 

7. To assemble: In the cast iron pot, layer your ingredients in this order.
Bottom layer: Chinese cabbage
Middle layer: tofu pok, fish maw
Top layer: Smoked duck, roast pork, mushroom, sea cucumber, Hokkaido scallops, broccoli, tiger prawn, abalone, fatt choy, goji.

How to make poon choi


Click here to watch a short YouTube video on how to assemble a poon choi at home: 


8. Pour sauce, from Step 6, over the ingredients (except roast pork, to keep the skin crispy). Enjoy!

How to make poon choi
poon choi recipe poon choi recipe poon choi recipe poon choi recipe poon choi recipe poon choi recipe poon choi recipe poon choi recipe poon choi recipe poon choi recipe poon choi recipe poon choi recipe
If you enjoyed reading my posts, LIKE me on Facebook! You can also follow me on Instagram (@babysumo) for more photo updates or subscribe to our YouTube channel.Thanks :)

Wednesday, January 19, 2022

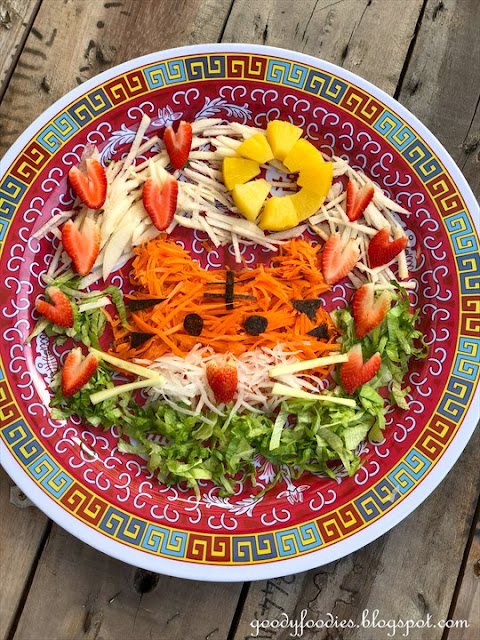
Year of the Tiger Yee Sang (CNY 2022)

This Chinese New Year, we welcome the Year of the Tiger. As previous years, together with my kids, we designed a Tiger Yee Sang using fresh fruits and vegetables to commemorate this special occasion. 

Let’s “lou” to a healthy and prosperous new year!

Tiger Yee Sang


What you will need:
Carrot : for tiger face and ears
Radish: for tiger face
Roasted seaweed: for tiger stripes/eyes
Cucumber: whiskers
Pineapple: sun
Lettuce
Pear
Strawberry hearts
Condiments: crushed peanuts, crackers, dressing (2T EVOO, 1T white balsamic vinegar, 1T honey)
Optional: salmon sashimi, abalone, Bak kwa, scallops, smoked duck, lobster.

You can check out the step-by-step video tutorial here:

tiger yee sang cny 2022 tiger yee sang cny 2022 tiger yee sang cny 2022 tiger yee sang cny 2022 tiger yee sang cny 2022 tiger yee sang cny 2022 tiger yee sang cny 2022 tiger yee sang cny 2022
If you enjoyed reading my posts, LIKE me on Facebook! You can also follow me on Instagram (@babysumo) for more photo updates or subscribe to our YouTube channel. Thanks :)

Saturday, May 22, 2021

Recipe for Best Chocolate Brownies!

One of our favourite sweet treat is chocolate brownies. My kids go gaga for them! 

Nowadays, I enlist the help of DJ Dan to make this. He really loves making them cos ..well, he gets to enjoy it once we're done. These chocolate brownies are the best ever - moist and fudgy with a slight crust on the outside and pops of saltiness from the Maldon salt flakes. YUM!

Best Chocolate Brownies recipe


Watch the step-by-step video on our YouTube channel (link here)

Best Chocolate Brownies
Recipe by Baby Sumo, adapted from here
Preparation time: 15-20 minutes
Cooking time: 30 minutes
Makes 16

Ingredients
110g butter
50g good-quality dark chocolate (at least 70% cocoa)
2 eggs, beaten
200g caster sugar
50g plain flour, sifted
1 tsp baking powder
1/4 tsp salt
30g chopped nuts - walnuts, almonds, hazelnuts

Extra chocolate chips, for topping (optional)
A few pinches of Maldon or sea salt


1. Preheat oven to 180°C (no fan).

2. Grease and line a baking tin measuring 8 x 8 inches with baking paper. 

3. Place the butter and the chocolate together in a heatproof bowl and melt over the top of a saucepan filled with simmering water on low heat. Once melted, remove from heat and allow to cool slightly. 

4. Stir in the other ingredients (eggs, sugar, flour, baking powder, salt, nuts) into the chocolate mixture, and then pour into the lined tin. Top with extra chocolate chips and sprinkle some Maldon salt.

5. Bake in the preheated oven for 30 minutes. A skewer inserted in the centre should come out cleanly (but do not overcook).

6. Leave the brownies to cool in the tin for 10 minutes before dividing into 16 squares and transferring them to a wire rack to finish cooling. Enjoy!


Best Chocolate Brownies recipe

Best Chocolate Brownies recipe

Best Chocolate Brownies recipe Best Chocolate Brownies recipe Best Chocolate Brownies recipe Best Chocolate Brownies recipe Best Chocolate Brownies recipe Best Chocolate Brownies recipe
If you enjoyed reading my posts, LIKE me on Facebook! You can also follow me on Instagram (@babysumo) for more photo updates or subscribe to our YouTube channel.Thanks :)

Thursday, May 13, 2021

How to Make Lemang (Without Bamboo)(Recipe Video)

 Firstly, Selamat Hari Raya Aidilfitri to all my Muslim friends and readers!

Lemang, together with rendang, are two of my favourite things to eat during Raya! So, for the past two years, we have been making these two dishes during the Raya celebrations. Here is a short recipe video we made today, showing the step-to-step instructions for making lemang at home (without the bamboo!):

Click here to watch the video on YouTube :)


The full written recipe can be found on this link.

lemang recipe lemang recipe lemang recipe lemang recipe lemang recipe lemang recipe lemang recipe
 how to make lemang at home how to make lemang at home how to make lemang at home how to make lemang at home how to make lemang at home how to make lemang at home how to make lemang home

If you enjoyed reading my posts, LIKE me on Facebook! You can also follow me on Instagram (@babysumo) for more photo updates or subscribe to our YouTube channel.Thanks :)

Wednesday, February 24, 2021

Recipe: Spicy Garlic Prawns with Cashew Nuts

Prawn is a must-have ingredient during Chinese New Year as it symbolises laughter and happiness. During Chinese New Year, we will usually get large prawns such as these.

Spicy Garlic Prawns


This is a delicious Spicy Garlic Prawn recipe which you can try making at home.Simply toss your prawns in some garlic powder, chilli flakes and oil. Cook until crispy and then toss in garlic-oil sauce along with some salted butter. I also added some toasted cashew nuts as their shapes look like gold ingots and spring onion which is a symbol for spring.

Since you will be shallow frying your prawns in oil, it is much better to use garlic powder than raw garlic in this recipe as it will not burn when you fry them. Furthermore, the lovely garlic flavours are infused into the shells and sauce. Super easy yet finger licking good - try it!

Spicy Garlic Prawns

Click here to watch the cooking video on YouTube (link here)


Spicy Garlic Prawns
Recipe by Baby Sumo
Preparation time: 5 minutes
Cooking time: 15-20 minutes
Serves 4

Ingredients
10 large prawns, trimmed
4 tbsp cooking oil
1 tbsp garlic powder
1/2 - 1 tsp chilli flakes
A pat of butter
1/8 tsp salt
A large handful toasted cashew nuts
1 stalk spring onion, green parts only, cut into 1"lengths

1. In a bowl, mix 2 tbsp cooking oil, chilli flakes and garlic powder. Add prawns and toss to coat. 

2. In a large pan or wok, heat 2 tbsp oil over medium high heat. Once oil is hot, add prawns, depending on the size of your pan, and cook until prawn is crispy. Remember not to overcrowd your pan. Cook in a few batches until all prawns are cooked. Once ready, remove from pan and set aside.

3. To the same pan, add butter and also the garlic-chilli oil from Step 1. Toss the cashew nuts and season with salt. Add cooked prawns back and toss in the sauce. Add spring onions and cook for a further minute. Serve.

Spicy Garlic Prawns
 Spicy Garlic Prawn recipe  Spicy Garlic Prawn recipe  Spicy Garlic Prawn recipe  Spicy Garlic Prawn recipe  Spicy Garlic Prawn recipe  Spicy Garlic Prawn recipe  Spicy Garlic Prawn recipe 
If you enjoyed reading my posts, LIKE me on Facebook! You can also follow me on Instagram (@babysumo) for more photo updates or subscribe to our YouTube channel.Thanks :)

Monday, February 22, 2021

Recipe Video: Stir Fried Scallops with Sugar Snap Peas

Here's another easy recipe for Chinese New Year and beyond! Scallops symbolises new opportunities, so is a great dish to serve during CNY. We also regularly cook this for our weekday meals cos... it's easy to cook and will be ready in less than 10 minutes.

For this recipe, we like using medium-sized scallops. They cook in a minute; remember not to overcook cos scallops, like many other seafood, shrinks and becomes rubbery when you cook them for too long.

Stir fried scallops with sugar snap peas


Click here to watch the video on YouTube ;) (link here)

Stir fried scallops with sugar snap peas Stir fried scallops with sugar snap peas Stir fried scallops with sugar snap peas Stir fried scallops with sugar snap peas Stir fried scallops with sugar snap peas Stir fried scallops with sugar snap peas Stir fried scallops with sugar snap peas Stir fried scallops with sugar snap peas
Stir fried scallops with sugar snap peas
Recipe by Baby Sumo
Preparation time: 5 minutes
Cooking time: 8-10 minutes
Serves 4

Ingredients
300g scallops
2 tbsp cooking oil
2 cloves garlic, finely chopped
120g sugar snap peas or sweet pea, trimmed
1/3 carrot, peeled and thinly sliced
1 tbsp water
1/2 tsp chicken stock granules
Freshly ground black pepper

1. See video for cooking instructions.

If you enjoyed reading my posts, LIKE me on Facebook! You can also follow me on Instagram (@babysumo) for more photo updates or subscribe to our YouTube channel.Thanks :)
Related Posts Plugin for WordPress, Blogger...