Showing posts with label Cooking with Kids. Show all posts

Tuesday, September 13, 2022

Ideal Recipes for Your Kids with Alce Nero™ Condiments

Cooking is a life skill that is increasingly valued globally. Families are encouraging children to start cooking from a young age to encourage independence.

Encourage your child, starting with simple tasks such as preparing cold beverages, salad or other dishes that require assembly or baking rather than stove-top skills. As they gain confidence they can graduate to stove-top cooking with your guidance. With more practice, they can soon prepare snacks, drinks and salads for themselves and for the family.

Some of the easiest recipes for children use condiments to impart flavours that uplift even the simplest preparations to the next level. Alce Nero™, a leader in organic food including, pasta, pasta sauces, honey, jams, olive oil, apple cider vinegar and balsamic vinegar among others, has compiled four simple recipes to get children started on a culinary journey for World Parents’ Day Celebration on July 24 and for everyday thereafter.

The condiments featured are Alce Nero™ Apple Cider Vinegar, Alce Nero™ Balsamic Vinegar, Alce Nero™ Organic Wildflower Honey and Alce Nero™ Extra Virgin Olive Oil. These organic condiments are packed with health benefits, being a mainstay of the heart-healthy Mediterranean diet[1].

Share these recipe ideas with your kids and help them pamper you!

Caprese Salad
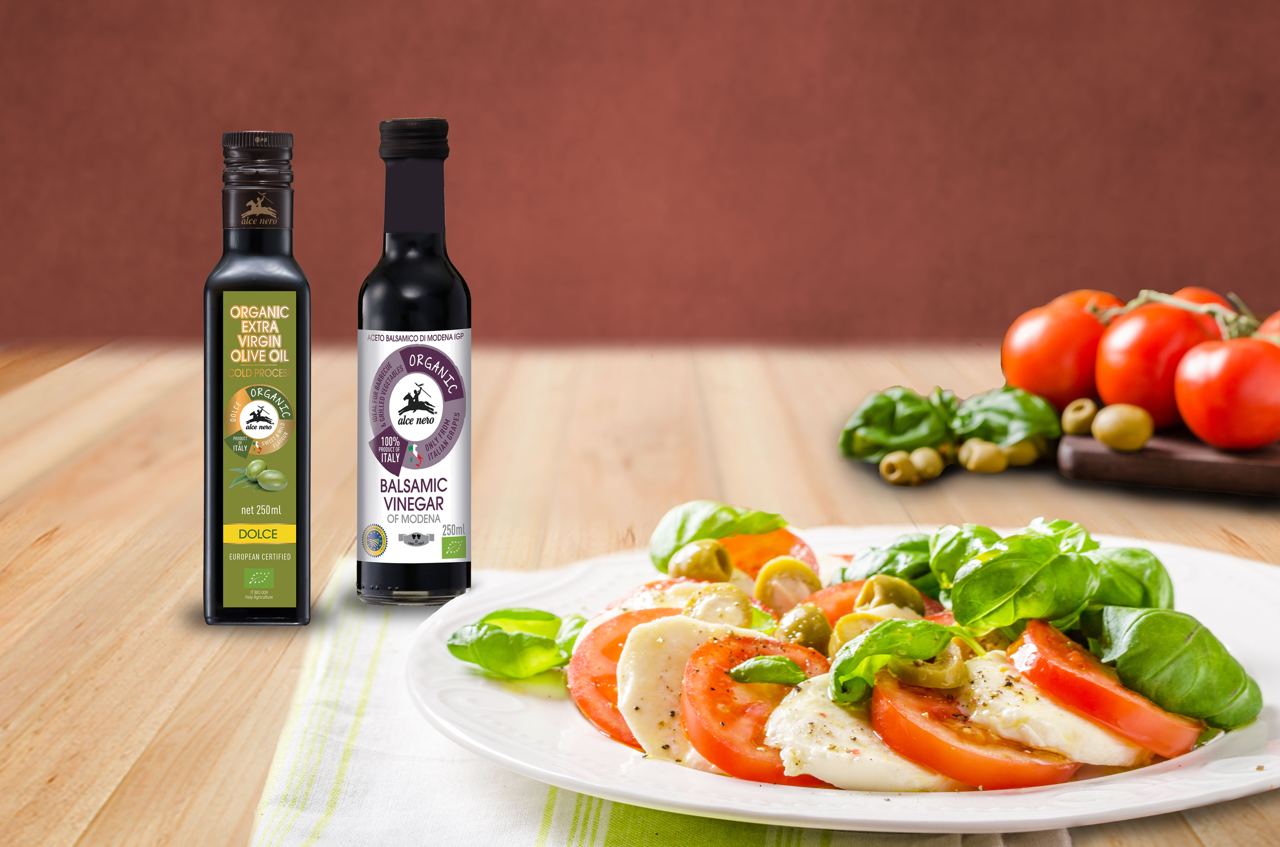

Caprese salad offers great flavour from the combination of just a few ingredients. Only the tangy balsamic glaze requires minor stove-top time.

Make the balsamic vinegar glaze by placing the Alce Nero™ Balsamic Vinegar into a small saucepan, bring to a gentle boil on low heat. It should reduce and thicken in 6 to 8 minutes. Set aside. Select fresh, juicy and sweet tomatoes, Roma tomatoes are best but any large red tomato can be used. Slice tomatoes and fresh mozzarella into 1 cm thick rounds. Eat the less than perfect rounds of tomatoes and cheese – chef’s treat!

On a plate, arrange the tomato and cheese slices, overlapping and alternating them. Wash and pat dry fresh sweet basil leaves. Arrange over the beautifully assembled tomato and cheese slices. Drizzle with the balsamic vinegar glaze and Alce Nero™ Extra Virgin Olive Oil before sprinkling with sea salt and freshly ground black pepper.

Why this recipe: Output is greater than input. You will be impressed, kids will be delighted by their own capabilities, and everyone can dig in to one of the simplest and tastiest salads.

Prep time: 10 minutes, cook time: 10 minutes, serves: 4 pax


Sparkling Apple Cider Vinegar Limeade


The kids can energise weekend meals, or weekday dinner with this sparkling apple cider vinegar limeade. So easy and so refreshing, especially on hot days. In a jug, combine 3 litre sparkling water, 3 tablespoon of Alce Nero™ Apple Cider Vinegar, juice from 5 limes, and 4 tablespoon of Alce Nero™ Organic Wildflower Honey. Mix well, then top with ice cubes. Pour into pretty glasses, garnish with lime slices, take a sip, sigh with happiness and enjoy with the family.

Why this recipe: Great for young children as it is so simple but can look so fancy with a bit of garnish and a metal or glass straw. For parents, it is a healthier option to coffee.

Prep time: 10 minutes, no cooking required, serves: 5 pax


Spaghetti with Olive Oil and Garlic (Aglio e Olio)


Perhaps the simplest spaghetti dish for beginners but the taste is worth much more than the minimal effort. Your child may require help with this one if they are inexperienced with stove-top cooking.

Prepare 450g Alce Nero™ Spaghetti according to the pack instruction. Six minutes in boiling water for al dente pasta. As the pasta cooks, in a large fry pan combine garlic, Alce Nero™ Extra Virgin Olive Oil, salt, and red pepper flakes to taste, and warm over low heat until the garlic softens and turns golden. Chef’s tip if you love garlic add more for a more intense flavour.

Drain the pasta, reserving about a ½ cup of the cooking water. Add the Alce Nero™ Spaghetti and the reserved water to the garlic mixture. Mix well until the Alce Nero™ Spaghetti is well coated in garlicky olive oil. Transfer to a large serving bowl or divide among individual plates. For garnish, add parsley and lemon zest. Serve immediately.

Why this recipe: Simple pantry staples come together quickly and easily in this Italian classic. Kids will feel accomplished making this, and you won’t need to make dinner.

Prep time: 10 minutes, cook time: 15 minutes, serves: 5 pax


Tomato Bruschetta


Café quality starter that is as tasty as it is pretty.

Preheat oven to 200 degrees C. Place bread slices on a baking sheet. Toast for 5 minutes. Remove from oven. Rub the toasted side with cut garlic. Set aside. In a bowl, toss chopped tomatoes, cheese, Alce Nero™ Extra Virgin Olive Oil, Alce Nero™ Balsamic Vinegar, onion, basil, salt and pepper together. Divide evenly over the toast.

Why this recipe: Kids love making something that their family can enjoy together, and this recipe is simple and stunning.

Prep time: 10 minutes, cook time: 10 minutes, serves: 5 pax
 

Malaysians can use Alce Nero™ products with confidence as it is certified Halal by official certification bodies recognized by JAKIM.

Alce Nero™ products are available at AEON, Ben’s, Cold Storage, Giant, Jaya Grocer, Village Grocer, TF Value and via the Ayam Brand Shopee Official Store & Ayam Brand Lazada Official Store.


For more easy, quick and healthy recipes that kids can be prepared by their own, please visit https://alcenero.asia/recipes.html and Facebook page https://www.facebook.com/AlceNeroMalaysia/.


[1] https://www.healthline.com/health/balsamic-vinegar-health-benefits

If you enjoyed reading my posts, LIKE me on Facebook! You can also follow me on Instagram (@babysumo) for more photo updates or subscribe to our YouTube channel. Thanks :)

Sunday, January 30, 2022

Recipe: Tiger Stripes German Cookies

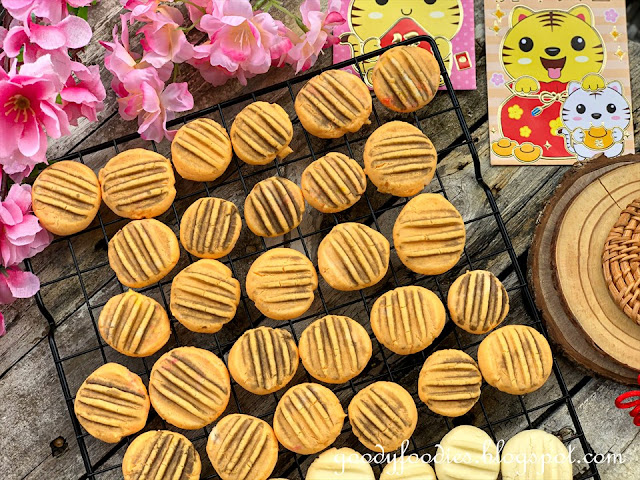
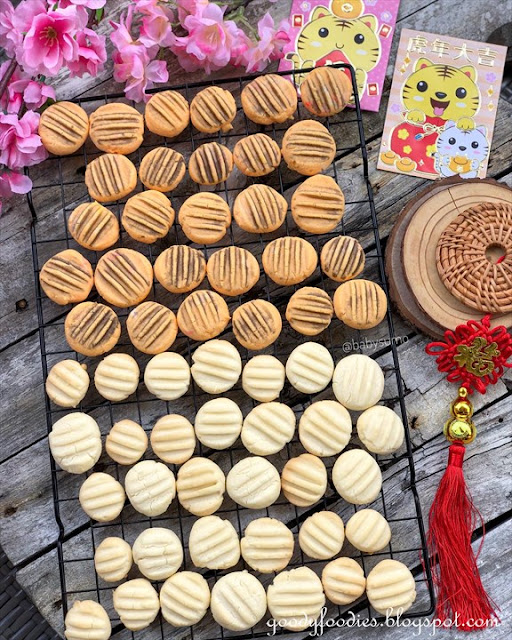
German cookies is one of our must-have CNY cookies. Since it's the Year of the Tiger, we got the idea of making these Tiger Stripes German Cookies. It's simple and quick, and looks the part. If you have 45 minutes to spare, then go ahead and make some for Chinese New Year. 

Tiger Stripes German Cookies

We made half regular and half Tiger Stripes German Cookies. 
Tiger Stripes German Cookies


Tiger Stripes German Cookies
Recipe by Baby Sumo
Preparation time: 30 minutes
Cooking time: 16 minutes (per batch)
Makes about 70 (or fills 2 tubs)

Ingredients
188g butter, softened at room temperature
60g icing sugar, sifted
188g potato starch/flour, sifted
120g plain flour, sifted

For the tiger stripes
1-2 drops orange food colouring
1-2 drops black food colouring
1 tbsp water


1. Preheat oven to 170°C (no fan). Line 2 baking trays with greaseproof paper.

2. Using an electric mixer, beat the butter and icing sugar until light and fluffy, about 5 minutes.

3. Add the potato starch and plain flour, and mix to form a soft dough. You should be able to pinch off some with your fingers and roll into a ball without any sticky residue. If it's too sticky, add an extra tablespoon of potato flour. 

4. We made half regular German cookies and half Tiger Stripes German Cookies. Divide the dough into half. 

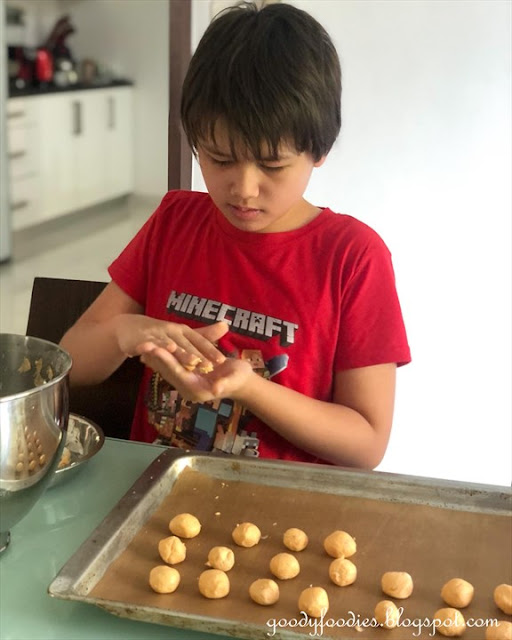
5. For the regular German cookies: Roll into small balls (about 2-3cm diameter), arrange on the baking tray and press lightly with a fork to flatten and make indentation, dipping the fork in water after each press to prevent the cookie dough from sticking to the fork.

6. For the Tiger Stripes German Cookies, add the orange food colouring to the dough and mix for 10 seconds until well incorporated. Roll into small balls as above and place on baking tray. In a small bowl, add 1 tbsp of water and 1-2 drops of black food colouring. Dip your fork into this black colored water and flatten the German cookies to make "stripes" indentation. 

making Tiger Stripes German Cookies


8. Bake in preheated oven for 16 minutes.  Allow to cool on baking tray and store in a tupperware once cooled.

Note: 
1. These cookies taste best after they have been stored for at least 24 hours.
2. If you do not have orange colouring, you can use pink + yellow food colouring at 1:1 ratio (ie 1 drop pink and 1 drop yellow food colouring). 

Tiger Stripes German Cookies

If you enjoyed reading my posts, LIKE me on Facebook! You can also follow me on Instagram (@babysumo) for more photo updates or subscribe to our YouTube channel.Thanks :)

Wednesday, January 6, 2021

Recipe: French Bean Omelette (with Video)

BabySumoKids' school holidays have been extended for another month, so we've been homeschooling them at home. For his "Home Economics" class,  I taught Daniel how to make an easy French bean omelette. You can also make this omelette using long beans. This is a great and easy beginner level dish you can teach to your kids.

French Bean Omelette recipe


You can watch the video at this YouTube link. 


French Bean Omelette
Recipe by Baby Sumo
Preparation time: 5 minutes
Cooking time: 5 minutes
Serves 3-4


Ingredients
10 French beans, washed, trimmed and finely chopped
3 eggs
2 tbsp cooking oil
1 tsp light soy sauce
White pepper
Thai chilli sauce, to serve

1. In a bowl, break eggs and then lightly beat with a fork.

2. Heat oil in pan or wok over medium high heat. Add French beans and cook for about 2 minutes, until translucent. 

3. Pour in eggs and cook until about 80% set, then use your spatula to flip over and cook the other side for a further minute.

4. Serve your omelette with some Thai chilli sauce.

French Bean Omelette recipe
French Bean Omelette recipe French Bean Omelette recipe French Bean Omelette recipe French Bean Omelette recipe French Bean Omelette recipe French Bean Omelette recipe French Bean Omelette  
If you enjoyed reading my posts, LIKE me on Facebook! You can also follow me on Instagram (@babysumo) for more photo updates or subscribe to our YouTube channel.Thanks :)

Wednesday, August 5, 2020

How to Make Oyakodon (Recipe Video)

Oyakodon is one of the easiest donburi you can try making at home. Oyako, literally translates to "parent-and-child", referring to the chicken and egg used in making this dish.

Do check out our latest video on YouTube on how to make oyakodon - it's so simple, believe me! Even BabySumoKids can do it with minimal assistance.


Click here for the full recipe.
how to make oyakodon how to make oyakodon how to make oyakodon how to make oyakodon how to make oyakodon how to make oyakodon how to make oyakodon how to make oyakodon
If you enjoyed reading my posts, LIKE me on Facebook! You can also follow me on Instagram (@babysumo) for more photo updates or subscribe to our YouTube channel. Thanks :)

Saturday, July 18, 2020

Recipe: Quick & Easy Hawaiian Pizza

What is your favourite pizza flavour? For us, it is definitely Hawaiian Pizza (or Aloha pizza, depending on which pizza place you go to) or simply known as Pineapple Pizza. Typical toppings on a Hawaiian Pizza include chicken, ham, cheese and tomatoes along with juicy chunks of pineapples.

Homemade Hawaiian pizza

Here's a quick, easy version you can make at home using tortilla wraps as the pizza base. You can even get your kids to assemble their own pizzas - my kids love it as they customise and put on as much ingredients as they like on their personal pizzas.

Sweet, savoury and tangy, these are simply the perfect combination of flavours on a pizza.

Hawaiian pizza


Hawaiian Pizza
Recipe by Baby Sumo
Preparation time: 2-3 minutes
Cooking time: 15 minutes
Serves 4

Ingredients
4 tortilla wrap
Mozzarella cheese (as much as you like)
1 - 1 1/2 cup fresh pineapple chunks (or canned)
4 tsp double concentrate tomato puree
8 cherry tomatoes, quartered (optional)

For the chicken
250g chicken breast or fillet, cut into thin strips
1 tsp light soy sauce
1/8 tsp cumin powder
1/8 tsp coarse black pepper
1/8 tsp dried thyme
1 tbsp cooking or olive oil

To garnish
Fresh basil, chopped

1. Preheat oven to 180°C (no fan). Line two baking trays with baking paper.

2. Place all ingredients for chicken in a bowl and mix well. Leave to marinate for 2-3 minutes.

3. Heat oil in a wok or large frying pan over medium high heat. Add chicken and cook for 4-5 minutes, until cooked through.

4. To assemble your pizza: Place tortilla wraps on baking tray. Spread 1 tsp tomato puree onto each tortilla base, then top with generous amount of mozzarella cheese. Top with other ingredients such as cooked chicken strips, pineapple chunks and cherry tomatoes.

5. Place in preheated oven and cook for 8-10 minutes, until base is crisp and cheese has melted. Remove from oven, slice into quarters or eighths, garnish with fresh basil and enjoy!

Note: The Cirio concentrated tomato puree is available in tubes. Handy to have in the kitchen. For the tortilla wraps, we prefer the "G" brand best for homemade pizzas.

Homemade Hawaiian pizza
Homemade Hawaiian pizza recipe Homemade Hawaiian pizza recipe Homemade Hawaiian pizza recipe Homemade Hawaiian pizza recipe Homemade Hawaiian pizza recipe Hawaiian pizza recipe
If you enjoyed reading my posts, LIKE me on Facebook! You can also follow me on Instagram (@babysumo) for more photo updates or subscribe to our YouTube channel. Thanks :)

Tuesday, May 5, 2020

Recipe: Mini lime syrup sponges (Nigella Lawson)

Need inspiration for Mother's Day?

Mother's Day is fast approaching (it's this coming Sunday, guys!), but if you haven't gotten her anything this year, I have a recipe especially for you.  These delicious Mini Lime Syrup Sponges will surely put a smile on your mother's face.... it certainly did for me, when BabySumoKids made these for me for teatime one day.

Mini lime syrup sponges


This beautiful recipe yields a soft, tender sponge soaked in lime syrup. Loved the lovely aroma from the lime zest too! The original recipe call for self-raising cake flour, however I've provided a substitution which you can use (with the more commonly found all-purpose flour in our kitchens).

This is an easy recipe, which kids can do all by themselves with minor supervision. They turned out absolutely divine and certainly went down a treat, perfect with a cuppa tea!

Mini lime syrup sponges recipe

Mini lime syrup sponges


Mini Lime Syrup Sponges
Recipe by Baby Sumo, adapted from Nigella Lawson
Preparation time: 15-20 minutes
Cooking time: 25 minutes
Makes 8

Ingredients
113g butter, softened at room temperature
1/2 cup plus 1 tbsp caster sugar
2 large eggs
Zest of 1 lime
1 cup all-purpose flour
2 tbsp cornstarch
1 1/2 tsp baking powder
Pinch of salt
4 tbsp milk

For the syrup:
4 tbsp lime juice (from 2-4 limes, depending on size)
5-6 tbsp icing sugar


1. Preheat oven to 180°C (no fan). Grease the inside of the 8-cup mini loaf pan using melted butter or oil.

2. Sift the all-purpose flour, cornstarch, baking powder and salt into a bowl. Mix well.

3. Using an electric mixer, cream the butter and sugar until pale, light and creamy, about 5-6 minutes. Then, add the eggs one at a time, and beat well, repeat until all eggs are used. Mixture should be light and fluffy. Add the lime zest.

4. Fold in sifted flour in 3 batches, until well combined. Add the milk and mix well. Your batter should be of a dropping consistency at this point.

5. Spoon batter into prepared mini-loaf pan and place in the preheated oven. Bake for 25 minutes.

Mini lime syrup sponges


6. While the cakes are cooking, make the syrup. Place lime juice and icing sugar in a small saucepan and gently heat and stir until sugar dissolves. See Note 1. 

7. As soon as the mini sponges are ready, take them out of the oven and prick all over using a cake tester or skewer. Then, spoon over lime syrup. Allow cake to cool for at least 1 hour before removing from tin. Grate lime zest over the cakes and serve.

Mini lime syrup sponges


Note:
1. Original recipe calls for 1/2 cup icing sugar for the syrup. However, I recommend you start with 1/4 cup (which is equivalent to 4 tbsp) and then gradually add 1 tbsp at a time to get the taste that you like. We used 5 tbsp in total.
2. If you do not have a mini loaf pan, you may also do this in 9 x 4 inch loaf pan, lined with baking paper. For the loaf pan, you will need to bake the cake for 45 minutes. You can get 16 slices from this loaf.

Mini lime syrup sponges Nigella Lawson

Mini lime syrup sponges Nigella Lawson

Mini lime syrup sponges Nigella Lawson

The same recipe, made in a loaf pan.Please see Note 2 above for baking instructions.
Lime syrup sponge cake recipe


Lime syrup sponge cake recipe


Mini Lime Syrup Sponges Mini Lime Syrup Sponges Mini Lime Syrup Sponges Mini Lime Syrup Sponges Mini Lime Syrup Sponges Mini Lime Syrup Sponges Mini Lime Syrup Sponges
If you enjoyed reading my posts, LIKE me on Facebook! You can also follow me on Instagram (@babysumo) for more photo updates or subscribe to our YouTube channel.Thanks :)

Monday, April 20, 2020

Skillet x Beta KL: Stay Home and Cook a Fine Dining Meal!

Craving for a restaurant quality meal at home? Skillet x Beta recently launched their DIY Menu, where one can enjoy a fine dine meal in the comfort of their home during the Movement Control Order (MCO) period.

The DIY Menu, which is available for both takeaway and delivery from 11am to 7pm daily, consists of five appetizers, five mains and four desserts to choose from. A selection of artisan bread such as Dried longan and goji berries loaf and Curry Foccacia can be added-on to complement your meal.


To demonstrate exactly how easy and fuss-free it is, BabySumoKids took over the reins in the kitchen and took turns plating these beautiful dishes up.

Everything is nicely packed and you just need to watch the instruction videos before you start. Most of the dishes come with precooked ingredients and only require minor heating and then you plate the dish according to your creativity. The food was ultra delicious (exactly what you would get if you dine in at their restaurant) and the kids had so much fun too, playing the role of little chefs (and even servers for the evening). Best of all, mummy got a day off in the kitchen and still get to enjoy an excellent meal at home.

Here are some of the dishes that we had: Dried longan and goji berries loaf, Sous vide Norwegian salmon, Lawas risotto with scallops, Confit Pongteh duck leg, Musang king durian mousse and Chocolate and Earl grey tea mousse.


All dishes are plated by BabySumoKids - well done kids!


All the step-by-step instruction on how to prepare your meal can be found on Skillet at 163 and Beta KL's IG accounts. Please Whatsapp them at 019-2121 240 to place your order.

Click here to view the DIY Menu. They also have a To-Go menu with a range of ready to eat meals, click here for the menu.

skillet x beta diy menu skillet x beta diy menu skillet x beta diy menu skillet x beta diy menu skillet x beta diy menu skillet x beta diy menu skillet x beta diy menu skillet x beta diy menu

If you enjoyed reading my posts, LIKE me on Facebook! You can also follow me on Instagram (@babysumo) for more photo updates or subscribe to our YouTube channel. Thanks :)

Sunday, April 12, 2020

Recipe: Carrot cupcakes with cream cheese frosting (Easter)

Happy Easter everyBUNNY! Whenever Easter approaches, I have a major urge to make (and eat!) carrot cake (or cupcakes) with cream cheese frosting.

Carrot cupcake with cream cheese frosting


This carrot cupcake recipe is an egg-cellent one to do with your children. Easy and straightforward, your children can measure out the ingredients, mix it all in a bowl and then fill them in cupcake liners. Once baked and cooled, the cupcakes are frosted with cream cheese. So moist and delicious!

Easter cupcakes recipe for kids

Carrot cupcakes with cream cheese frosting


Carrot cupcakes with cream cheese frosting
Recipe by Baby Sumo
Preparation time: 15 minutes
Cooking time: 22-25 minutes
Makes 8

For the cupcake
125g self raising flour, sifted
A pinch of salt
1 tsp ground cinnamon
1 tsp ground nutmeg
125g soft brown sugar
2 eggs, at room temperature
125ml corn oil
100g carrot, peeled and finely grated (approx. 2 medium carrot)
Zest of 1 orange or lemon
25g walnuts, chopped into small pieces
25g sultanas
1/2 tsp vanilla extract


For the cream cheese frosting
100g cream cheese, softened at room temperature
2-3 tbsp icing sugar

1. Preheat oven to 180°C (no fan). Line muffin-tray with 8 cupcake liners.

2. Place the flour, salt, ground cinnamon and nutmeg into a large bowl and stir in the brown sugar. Add the eggs and corn oil to the dry ingredients and mix well. Stir in the grated carrot, orange or lemon zest, sultanas, chopped walnuts and vanilla extract.

3. Fill the cupcake-liners to 2/3 full and then bake in the preheated oven for 22-25 minutes or until a skewer inserted in the centre comes out clean. Allow cupcakes to cool for 10 minutes before frosting.

Easter cupcakes recipe for kids


4. Meanwhile, make the frosting. Combine the cream cheese frosting with icing sugar and mix well. Set aside in fridge until required.

5. Using a knife, smear cream cheese frosting on the cupcakes.You may decorate as you like. For the carrot roses, peel long thin strips of carrot using a peeler, then roll and secure ends with some cream cheese. Place on cupcake along with mint leaves.

Carrot cupcakes with cream cheese frosting

Carrot cupcakes with cream cheese frosting Carrot cupcakes with cream cheese frosting Carrot cupcakes with cream cheese frosting Carrot cupcakes with cream cheese frosting
Easter cupcakes recipe Easter cupcakes recipe  Easter cupcakes recipe  Easter cupcakes recipe 
If you enjoyed reading my posts, LIKE me on Facebook! You can also follow me on Instagram (@babysumo) for more photo updates or subscribe to our YouTube channel. Thanks :)

Friday, February 23, 2018

Recipe: Easy Sugar-Free Banana Muffins (Baking with Kids)

So, we recently harvested not one, but TWO hands of bananas from our garden... which left us with a whole load of bananas ripening at the same time! 

Since it's the school holidays, I decided to get the kids into the kitchen and make some banana muffins together. This recipe has been adapted from Nigella Lawson's How to be a Domestic Goddess cookbook - it's a stir and bake recipe; super easy and quick and perfect for kids! Furthermore, no sugar is added into this bake, making this a healthy teatime treat!


Easy sugar-free banana muffins


Please enjoy this short video starring BabySumoKids...it's great seeing them so confident in the kitchen! If you'd like to see more videos from us (especially from the kids), do support us by subscribing to our YouTube channel and liking our videos. Thank you! :)


Easy Sugar-Free Banana Muffins
Recipe by Baby Sumo
Preparation time: 15 minutes
Cooking time: 25 minutes
Makes 12-13

Ingredients
60g salted butter
2 tbsp honey
1 tsp vanilla bean paste or extract
12 small ripe bananas
2 cups plain flour
2 tsp baking powder
1 tsp baking soda
1 tsp cinnamon
A pinch of salt


1. Preheat oven to 190°C (no fan).

2. In a saucepan over medium low heat, melt the butter. Once melted, add the honey and vanilla bean paste and mix well. Leave to cool for 5-10 minutes.

3. Peel and mash the bananas using a masher. Add the butter mixture from Step 2 to the mashed bananas and mix well.

4. In another bowl, mix the plain flour with baking powder, baking soda, cinnamon and salt.

5. Add dry ingredients (from Step 4) into the wet ingredients (Step 3) and fold gently until the ingredients are just mixed. Do not overmix.

6. Fill the paper cups until they are about 2/3 full and place into a muffin tray.


7. Place muffin tray into preheated oven and bake for 25 minutes. Leave in the pan to cool for 5 minutes, then remove to a wire rack and cool for another 10 minutes.

Note: We used pisang mas (small bananas), which you can substitute with 4 large ripe bananas.


If you enjoyed reading my posts, LIKE me on Facebook! You can also follow me on Instagram (@babysumo) for more photo updates. Thanks :)

Thursday, February 22, 2018

Recipe: Cute, Healthy Doggy Yee Sang (CNY)

Every year without fail, we would toss and eat our homemade yee sang on the 7th day of Chinese New Year. For the Year of the Dog, we made a cute doggy yee sang - for the face, you can use julienned radish and carrots. As it is a must to have fish in a Yee Sang, we used fish roe (tobiko) as well as fish biscuits this year. ;)

Year of the Dog Yee Sang (recipe)


The 7th Day of CNY is also known as Renri, aka the common birthday of all human beings... so Happy Birthday everyone!


Thanks to my little assistants for helping me put the cute doggy face together ;)


Doggy Yee Sang
Recipe by Baby Sumo
Preparation time: 30 minutes
Serves 4-6

Ingredients
1/3 radish, peeled and julienned
1 carrot, peeled and julienned
8-10 lettuce leaves, washed
1 Japanese cucumber, peeled and julienned
1 pack chuka wakame (seasoned seaweed)
6 strawberries, thinly sliced
1/2 can pineapple chunks
2 blueberry

Condiments
1/2 cup peanuts, crushed
Cracker
Fish biscuits
Tobiko (fish roe)

For the dressing
3 tbsp olive oil
2 tbsp white balsamic vinegar
1 tbsp honey


1. For the dressing, place oil, balsamic vinegar and honey in a bowl and mix well.

2.Arrange the julienned vegetables and fruits on a large plate in an attractive manner. For the Year of the Dog, you can use the julienned carrots (for the ears) and radish to form a dog face. Use two blueberries for its eyes and a strawberry cut into a triangle. I also arranged the pineapples to form a sun and cut some of the strawberries into heart shapes. Add the chuka wakame and tobiko to the plate.


3. Just before tossing, place crushed nuts, crackers and fish biscuit on the plate, and pour the dressing all over the yee sang. Toss, shouting out "good wishes" and enjoy!

Note: To assist with julienning the vegetable, get the julienne peeler from Daiso... so handy and does the job really quickly!

Note 2: For those who do not have white balsamic vinegar, you may substitute with 3-4 calamansi limes. The sauce should taste sweet and sour.


If you enjoyed reading my posts, LIKE me on Facebook! You can also follow me on Instagram (@babysumo) for more photo updates. Thanks :)
Related Posts Plugin for WordPress, Blogger...