Pages

Wednesday, October 31, 2012

Happy Halloween from the Fairy Princess & Roasted pumpkin with rosemary and sage

Boo! Happy Halloween. 

I wanted to make some scary treats for Halloween, but I think my kids are at the age where anything remotely scary placed in front of them would be labelled as "ugly" and shunned. Like their mother, they are much more fond of cute and pretty things. Ah, maybe when they grow a little older, I can experiment with creepy crawlies and ghosts!

What they do know about Halloween is that it's the time of the year when we see lots of pumpkin in the supermarket and in the shop windows as decor. Baby C's got this cute "pumpkin" bag which we take out whenever it's close to Halloween too. Around this time of the year, I also make a lot of pumpkin-related dishes such as soups, muffins, loaves and the easiest of them all, roasted pumpkin since my kids are very fond of this fall vegetable. 

Roasted pumpkin with rosemary and sage

Though simple, for us, this is one of the best ways to enjoy pumpkin. Pumpkin goes very well with herbs such as sage and rosemary, both of which we now have growing in our herb garden. Because we cut them into bite-size chunks, they took only around 15 minutes to roast. This would make a great accompaniment to any meat dish. You don't need much else, other than seasoning it with salt and pepper, since pumpkin is a naturally sweet vegetable. This is a good recipe for using up all the leftover pumpkin from Halloween.


Pumpkin in its raw form (you can remove the seeds and make your own roasted pumpkin seeds)


Roasted pumpkin with rosemary and sage
Preparation time: 10 minutes
Cooking time: 15-20 minutes
Serves 3-4

Ingredients
600g ripe pumpkin, cut into 4 x 3cm chunks
2 tbsp extra virgin olive oil
A handful fresh rosemary, leaves snipped
4-5 fresh sage, whole
2 tbsp butter, cut into small chunks
Salt and freshly ground pepper
3-4 sprigs of rosemary, to garnish

1. Firstly, place olive oil, rosemary and sage in a bowl and allow herbs to infuse into the oil for 10-15 minutes.

2. Place aluminium foil on a large baking tray. Using a brush, brush a thin layer of oil onto the foil. Place the pumpkin on the tray in a single layer.

3. Brush the pumpkin pieces with the herb oil, and then sprinkle the herbs over the pumpkin. Scatter the butter pieces in between the pumpkin pieces. Season with salt and pepper.


4. Bake in 170°C preheated oven for 15-20 minutes, until tender and the top layer looks slightly wrinkled. Remove from oven and serve in individual ramekins. Garnish with fresh rosemary sprig.


********************


Wishing you all a frightful Halloween... have a fa-boo-lous day, whatever you've got planned!


*Like my scary lil' ghost? Shaped from a sage leaf. Recipe for the muffins will be posted in December 2012.


Happy Halloween from the fairy princess ;)

*This recipe was featured on Asian Food Channel's Facebook page on 5 November 2012.

Tuesday, October 30, 2012

Set lunch @ Kung Jung Korean Restaurant, PNB Darby Park, KL

Sometime ago, I received an email from a reader, who suggested that I should try Restoran Kung Jung in PNB Darby Park since I like Korean food. I also received feedback from several blogger friends that the food there is good, hence Hubby and I went for lunch one day. 

Dolsot bibimbap

The restaurant is located on the third floor of PNB Darby Park. It is very spacious, and surprisingly very busy during lunch hour. The ventilation however, wasn't too good hence I walked out smelling like "beef ribs". LOL.

The menu was a mix of Japanese and Korean dishes. I was too lazy to pick a la carte dishes from the menu, and since I saw many people ordering the set lunch, I followed suit :P There were only 5 or 6 options for set lunch, each coming with unlimited refills of banchan and corn tea, a portion of grilled beef ribs (galbi), mains, fruits and Korean coffee / tea.


Corn tea

The beef ribs were not that great, unless you actually got a piece with some meat on them. This was Hubby's plate, he was luckier than me... I got mostly bone and gristle.


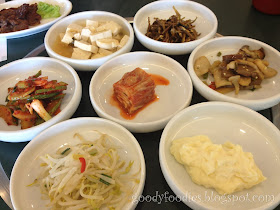
The banchan selection was pretty decent, from kimchi, anchovies, tofu, fish cake/ aubergine, mashed potato, beansprouts and spicy cucumber. We had refills of the kimchi, beansprouts and fishcake/aubergine.


Kimchi


Beansprouts (kongnamul)


Hubby's dolsot bibimbap set (RM32) was tasty. The sizzling claypot rice was good, laden with ingredients such as kimchi, spinach, beef (you can also opt for chicken), beansprouts and mushrooms with a raw egg. The gochujang (chilli pepper paste) is served separately, so you just add as much as you want. It is also served with a bowl of soup.


Very colorful - we like!

Mix well, let the raw egg cook against the sides of the hot stone bowl


It was a really hot afternoon, so I was drawn towards the naengmyeon (RM32), which is a cold noodle dish served in a large stainless steel bowl with iced tangy broth. It is topped with julienned cucumbers, Korean pear and half a boiled egg as well as a few slices of cold beef. The long and thin handmade noodles will be snipped tableside, for easier consumption. I have eaten this once in the Korean restaurant in Seremban but somehow I didn't enjoy it this time. It tasted a bit bland, I thought Hubby's dolsot bibimbap looked a lot more appealing.


Korean iced coffee


Or hot lemon tea


Verdict: The dolsot bibimbap was pretty good, however if overall price/ambiance/food was taken into consideration, I would have preferred to dine at Bulgogi Brothers.


Pork-free. 

Service: Fast.

Price: RM70 for 2 pax.

Location: Restoran Kung Jung, Lot No. 3.1, Level 3, PNB Darby Park, Jalan Binjai, 50450 Kuala Lumpur, Malaysia.

Tel: 03-2166 7181

GPS Coordinates: 3.158085,101. 718548

Monday, October 29, 2012

Recipe: Homemade Asian Pickled Green Chillies

Pickled green chillies are a great accompaniment to many Asian dishes, especially noodles. I love eating it with my dry wantan noodles or Hakka mee. Usually, a restaurant that serves this alongside their noodles will get extra brownie points from me.


Though I love eating it in restaurants, I do not like the idea of buying it from the supermarket since there are preservatives and other additives in there. I decided to make my own and was surprised how easy it was. It was literally done in under 20 minutes, and the pickled chillies were ready to eat the following day. You can store this in your fridge for a while, but I reckon if you have a little everyday, this will last you less than 3 weeks.


What you must remember is to put on disposable gloves when handling the chillies, especially since you'll be cutting up a whole load of them and you may need to remove some of the seeds. Or else you will suffer from the "chilli burn" later on.

After one day, the pickled chillies will turn from a vivid green to a dark (dull) green hue. Homemade pickled green chillies definitely feels fresher and crunchier (since it is stored in the fridge), and is so appetizing! Everyone should have a jar of this in their fridge ;) I reckon this would work just as well with jalapeƱo peppers.


How to Make Pickled Green Chillies Video (click here to watch video in full screen)


Pickled green chillies
Recipe by Baby Sumo, adapted from Amy Beh - Kuali
Preparation time: 20 minutes
Makes 1 large jar (approx. 20 servings)

Ingredients
300g green chillies
1/2 cup vinegar
1 cup boiled water, cooled
1 tbsp salt
5 tbsp caster sugar

Extra hot water, for Step 2


1. Wash and drain chillies well in a plastic colander.


2. Put on disposable gloves and cut chillies into thin round slices. Remove any seeds that look brownish (if you want it to be less spicy, then remove most of the seeds). Pour hot water over the sliced chillies and leave to sit for 10-15 seconds. Drain well and transfer chillies into a large jar.


3. In a separate bowl, mix vinegar, water, salt and sugar until sugar dissolves. Pour mixture into jar to pickle the chillies. The chillies will be ready the next day (or in a few hours time). Store in fridge until required. It will keep well for a year.


Before (vivid green)


After (dull green) - ready to eat!


Perfect with a bowl of noodles! (recipe for Hakka mee version 2.0 here)


*This recipe was featured on Asian Food Channel's FB page on 5 Nov 2012. 

Sunday, October 28, 2012

I baked: Healthy Sweet Potato and Raisin Loaf

Another healthy and delicious loaf we made recently was this sweet potato and raisin loaf. Very little sugar is added since sweet potato is naturally sweet. This loaf is best eaten warm - freshly baked out of the oven, it was very moist with a wonderful, crusty exterior. 


For this loaf, you can use any type of sweet potato (orange or purple or yellow). We used the purple Japanese sweet potato. You need to steam the sweet potatoes first, before mashing it for the loaf. I got my two wonderful kitchen helpers to give me a hand in mashing the sweet potato as well as beating the eggs. And of course, they helped me with the eating part as well ;)


Purple Japanese sweet potato


My cute little helpers :)

On the day it was baked, this loaf has a nice crusty exterior and a moist centre. We did find that the loaf wasn't as nice the next day as it tends to dry out a little. The best way to enjoy it is with some butter and a cuppa coffee/tea. The kids enjoyed this very much, it's also a great way to get more vegetables/fruit in their diet ;)


Sweet Potato and Raisin Loaf
Preparation time: 15 minutes
Cooking time: 1 - 1 1/4 hour
Makes 1 loaf

Ingredients
250g plain flour
2 tsp baking powder
1/2 tsp salt
1 tsp ground cinnamon
1/2 tsp grated nutmeg

450g mashed cooked sweet potatoes
30g soft brown sugar
115g butter, melted and cooled
3 eggs, beaten
75g raisins

1. Preheat oven to 180°C. Grease a 9 x 5 inch (23 x 13 cm) loaf tin.

2. Sift the flour, baking powder, salt, cinnamon and nutmeg into a mixing bowl. Set aside.

3. With an electric mixer, beat the mashed sweet potatoes with the brown sugar, butter and eggs until well mixed.


4. Add the flour mixture and raisins to the wet mixture. Stir with a wooden spoon until the flour is just mixed in. It may look a little lumpy at this point, but don't worry.

5. Transfer the batter to the prepared tin. Bake for 1 - 1 1/4 hours, or until a skewer inserted in the centre comes out clean.


6. Cool in the pan on a wire rack for 15 minutes, then turn the bread on to the wire rack to cool completely. I served them warm, after about 20-25 minutes after it came out of the oven with some butter.


Saturday, October 27, 2012

Dragon-i @ MidValley Megamall, KL

After reading the comments on my last Din Tai Fung post, I decided that we had to go and try the xiao long bao at Dragon-i to see which is better. The reason why we've never visited until now was because I did not know there was a Dragon-i in MidValley. Even when we went earlier this week, we had to ask for directions in order to find it. It is actually located in the lobby of Cititel Hotel, and you can get there via a small passage just before you reach Coffee Bean on Ground Floor of MidValley. 


Cute piggies

The restaurant is spacious and nicely appointed. Service was good, food was served quite quickly and our kids were given kids cutlery set without us having to ask. The restaurant serves Shanghainese cuisine/specialities and I ordered several dishes for us to share. Baby C put in a special request for the piggy pau that she saw when I was flicking through the menu.


Open kitchen, whereby one can view the chefs at work


Restaurant interior

Chef showing off his la mian making skills

Braised peanuts (RM2)


Of course the first thing on our order list is the xiao long bao (Shanghainese steamed meat dumplings). This is what we came here for, right? I would say texture wise, it is on par with Din Tai Fung's. The XLB here is handmade with at least 18 delicate folds. The filling is a mix of minced pork shank, ginger and natural pork skin gelatin, which after steaming melts into a delicious soup.

Price is slightly more expensive here (RM9.80 for 4 pcs vs DTF's RM12.30 for 8 pcs). I did notice that the broth in the XLB here was warm, rather than very hot, so you need not worry about scalding your tongue eating these. So, the XLB here deserves a thumbs up from me. :)


Perfect little parcels, eaten with ginger with Chinese black vinegar

Meaty goodness


Both kids squealed in delight when the piggy buns arrived at our table. Even the adults found them simply adorable. The cute little piggy is filled with red bean paste and lotus paste. Baby C picked the piggy with the pink ears. Baby D started off by eating the piggy's "face" LOL whereas Baby C ate everything except the face and ears, and just before she ate it all, she said "Sorry piggy, I'm gonna put you in my mouth now." It really made us laugh.

Steamed piggy bun (RM9 for two)


Coincidentally, Baby C was wearing her Peppa pig top, so she introduced piggy bun to Peppa. ;)


The deep fried beancurd with salt and pepper (RM8) was really delicious. The filling was smooth (like silken tofu) and the exterior was crisp. Quite a generous portion, Baby C helped herself to a few pieces as she liked it a lot.


The tofu filling was smooth and slightly cold, and the exterior hot and crispy. Great combo!


The only dish we did not really enjoy here was the chilled drunken chicken with "hua diao"rice wine (RM16). This was one of their recommended dishes, however I felt the chicken meat was just too fatty and the flavours weren't really that great. I also found it a little too salty for my liking.

La mian (hand-pulled noodles) made with top flour from Canada are a speciality here. The chefs, hail from Lanzhou, China and they can create 1800 finely crafted noodles in one minute. The la mian can be made into 6 different shapes - dragon beard, double width, flat face, broad face, Northern hand made and hand sliced.


We went for the dragon beard (finest one), which resembled mee suah a little in texture. We ordered the la mian with Shanghainese deep fried pork ribs (RM18). The la mian is served in a clear soup and topped with some chopped scallions. It was simple but nice. I love the pork ribs too, well-marinated and non-oily.


Crispy on the outside, tender on the inside - just as promised on the menu


Baby D slurping his la mian noodles!


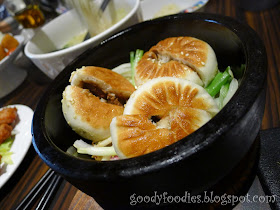
I wasn't sure which dumpling to order, but I was very glad that I picked the pan fried meat dumplings with teriyaki sauce in hot stone pot (RM10 for 3 pcs). Very very delicious, from the crispy dumplings to the teriyaki pork filling.


Seriously good dumplings


We ended our meal with these delectable salted egg yolk custard bun (RM9 for 3 pcs). They're a bit messy to eat since the filling oozes out as soon as you take a bite, but again it's very delicious! Soft buns with sweet-salty filling.


Filling overload! (just like a lava cake)


Current hairy crab promotion - 4 crabs for the price of 3 - RM198+


Hairy little fellas


Verdict: Great food, nice ambiance. Their xiao long bao definitely doesn't disappoint. Lots of other worthy dishes to sample here. 

Opening times: Mon-Fri 11.00 am - 10.00 pm, Sat - Sun 10.30pm - 10.00pm.

Service: Good.

Price: Total bill RM105.90.

Location: Dragon-i, Cititel Hotel, Main Lobby, Ground Floor, Mid Valley City, Lingkaran Syed Putra, 59200 Kuala Lumpur.

Tel: 03-2282 0155

Website: http://www.dragon-i.com.my/