Pages

Sunday, June 30, 2013

NOSH, Jalan Telawi 3, Bangsar, KL

After reading several glowing reviews about NOSH, we decided to give this restaurant a try. The restaurant is located at the top of Jalan Telawi 3, for convenience you can park in Bangsar Village and walk there. 


The interior is pretty basic but comfortable enough. When we visited, we were the only two customers in the restaurant. They have weekday set lunch for RM15 (a main course and a drink) but the selections did not appeal to us so we went for the a la carte menu. The a la carte menu is quite compact, with a selection of Western and fusion dishes.


Summer oasis mocktail (RM9)- raspberry puree, lychee syrup, pineapple juice and soda

Ginger Beer (RM6)

Hubby ordered The Nosh Rack (RM52), which is described as juicy rack of lamb with sauteed spinach and olives served with a delicious breaded portobello mushroom. When the dish arrived, we were really shocked at that way it was plated. We have been hearing from acquaintances about how nice the plating is here and to get this was pretty dissapointing. When we placed our order, the waiter asked how we would like it done, and we said medium rare so was expecting to see pink meat but unfortunately the meat was cooked towards well done. Thankfully, the meat is still pretty tender and everything was quite flavorful despite being a little salty in parts.


I ordered the Braised Lamb (RM38), which was described as succulent leg of lamb slowly braised in red wine and cherry tomato sauce, served with spaghetti. What I got was a dish with lots of pasta but only 5-6 small pieces of lamb, and I expected the lamb to be tender since it has been slowly braised but unfortunately it was a bit hard and chewy. Again, this dish was too salty for me. By now, I was not in the mood for desserts and I asked for the bill  after we finished the mains.


Price: RM115.50 for 2 pax.

Location: NOSH, 7 Jalan Telawi 3, Bangsar Baru, 59100 Kuala Lumpur.

Tel: 03-2201 3548

Saturday, June 29, 2013

Recipe: Apple cinnamon cake with whipped cream

It was all my brother's fault. You see, he baked an apple cake (which looked really delicious), posted it on Instagram, my mum saw it, then she asked me to bake one too. This whole Instagram thing is contagious, I tell you. 

Being a good daughter, I baked this apple as per mum's request. Not very pretty to look at, so as usual it has undergone some "make-up" from me in the form of whipped cream and chocolate chips. But a very delicious cake, very moist with soft chunks of apples and the lovely smell of cinnamon. 


If I am not mistaken, I used Granny Smith apples for this, since quite a lot of sugar is used hence the tartness of the apples balanced it out nicely. It keeps quite well in the fridge too; since this is quite a large cake we had to finish it over a few days but the cake remained moist, and I actually found it tasting better after a couple of days. This recipe is easy and straightforward, and after eating this cake, I am glad my brother shared his photo on Instagram ;)


Moist apple cake


Baby D says "Best"


Apple cinnamon cake with whipped cream
Recipe adapted from here
Preparation time: 15-20 minutes
Cooking time: 75-90 minutes
Serves 8-12

Ingredients
3 large apples (approx. 350-400g)
1 tbsp ground cinnamon
4 tbsp soft brown sugar

2 3/4 cups flour, sifted
1 tbsp baking powder
1 tsp salt
1 cup vegetable oil
1 1/2 cups soft brown sugar
1/4 cup orange juice
2 1/2 tsp vanilla extract
4 eggs, at room temperature

150g whipping cream
Fresh strawberries (optional)
Chocolate chips, for garnish


1. Preheat oven to 180°C / 350°F. Grease a tube pan with some oil.

2. Peel, core and cut apples into chunks. Toss with cinnamon and sugar and set aside.

3. Stir together flour, baking powder and salt in a large mixing bowl.

4. In a separate bowl, whisk together oil, orange juice, sugar and vanilla extract.

5. Make a well in the centre of the flour mixture (from Step 3) and pour the wet ingredients in (from Step 4) and mix well. Then add the eggs, one at a time and mix well ensuring all ingredients are incorporated.

6. Pour half the batter into prepared pan. Spread half of apples over it. Pour the remaining batter over the apples and arrange the remaining apples on top.

7. Bake for about 1 1/4 to 1 1/2 hours in preheated oven, or until a skewer inserted near the centre comes out clean. Allow to cool on a wire rack for 10 minutes, then turn out and unmould cake to cool completely.

8. Whip the cream until soft peaks are formed. Using a star nozzle, pipe the cream onto the cake and garnish with some chocolate chips. You can also pipe some cream on the side and top with a fresh strawberry.


If you enjoyed reading my posts, LIKE me on Facebook! Thanks ;)

Friday, June 28, 2013

Deep fried Mars Bar @ Captain Jax, Aberdeen Beach, Scotland

Deep fried Mars bar is a snack loosely connected to Scotland.  Now and then when I have conversations with foodie friends about food from Scotland, deep fried Mars bar would pop up, though Hubby says that there is nothing really Scottish about it except for its birthplace. 

The Carron Fish Bar in Stonehaven is the birthplace of the deep fried Mars bar, said to have been invented here in 1995. We visited The Carron as well as Sandy's in Stonehaven, but they were both closed when we visited. After trying our luck in a few other fish and chips shop (and getting lots of "Sorry we don't do them here"), we finally found it at Captain Jax on the Aberdeen beach front. 


Deep fried Mars bar


We were meeting some of our relatives here at the beach, and even they have not tried a deep fried Mars bar before, so we all watched in anticipation as the man behind the counter opened the Mars bar, placed it in the batter and deep fried it.


Aberdeen's No 1 fish and chips shop?


Warm and gooey inside with a crisp batter, it was actually pretty tasty, especially if you are a fan of Mars bars. It was sort of like eating a chocolate molten cake albeit in a different form. :P least I can say now that I've tried a deep fried Mars bar (and so can my relatives ;)).

Woohoo.. finally found a place that does deep fried Mars bar


Warm and gooey within


Captain Jax also does a range of Italian gelatos which look really good. Too bad we've already had some gelato before we stopped by here. A bonus for me is that I got to enjoy my first deep fried Mars bar with a beautiful view of the Aberdeen beach and coast.

Seagulls at Aberdeen beach


How lucky are we.... saw some Scottish pipers at the Aberdeen Beach Ballroom for the full Scottish experience :)

Bag pipes in action :)


If you enjoyed reading my posts, LIKE me on Facebook! Thanks ;)

Thursday, June 27, 2013

Recipe: Haggis, neeps and tatties (Scottish)

Inarguably one of the most famous Scottish dishes is haggis. It is usually served with neeps (turnips) and tatties (potatoes). Hubby volunteered to cook this for us for dinner one evening during our holiday.

Haggis, neeps and tatties and a dram


Haggis is a savoury pudding, traditionally made from sheep's pluck (heart, liver and lungs) which is minced with onion, oatmeal, suet, spices, and salt, mixed with stock and encased in the animal's stomach and simmered for approximately three hours. However, most modern commercial haggis is prepared in a sausage casing rather than an actual stomach. Its Scottish tag came about as a result of Robert Burns' "Address to a Haggis" and is considered the national dish of Scotland, usually served as a main course during Burns supper.

Most families would buy haggis from a reputable butcher or the supermarket. Every year, there would be competitions to find the "best haggis" and the winning butchers will proudly display their win on their shop window. Haggis can also be easily bought in any supermarkets all year round (in Scotland), and we chose Simon Howie's original haggis. Looking at the ingredients, they use lamb lungs along with beef liver and heart.


Haggis, before cooking


Since we did not do any research before shopping for the ingredients, we used turnips since it is directly translated to neeps in Scottish, but turns out the swede is also called neeps. Swede is orange in colour, so it gives a nice colour contrast to the tatties. We will just have to remember to get swede instead of turnips in future, however the mistake wasn't all that bad as the turnips have a subtle sweetness that went very well with the haggis.


Good job, Hubby!


The neeps and tatties are simply boiled and mashed separately. To cook the haggis, you can either cook in the oven for 90 minutes, boil for 45 minutes or put in the microwave for 5 minutes. Guess which option we went for? The easiest and fastest one of course :) The cooked haggis is served with a mound of neeps and tatties as well as a dram (a glass of Scotch whisky). To enjoy, simply mix everything on the plate together for a hearty Scottish meal. This particular haggis was quite peppery and moist, which I enjoyed.


Ended the meal with a very British dessert, also made by Hubby - stewed rhubarb with vanilla ice cream (recipe here). 


Haggis, neeps and tatties
Recipe by Baby Sumo
Preparation time: 15-20 minutes
Cooking time: 15-20 minutes
Serves 4


Ingredients
1 pack (454g) original haggis
2 turnips, peeled and cut into big chunks
5-6 boiling potatoes, peeled and cut into big chunks
50g butter
Salt and pepper
A dash of milk

1. Bring two pots of salted water to the boil, and cook the turnips and potatoes separately. Boil until soft, about 15 minutes.


2. Mash separately. For the mashed potatoes, add the butter, milk and season with salt and pepper.

3. For the haggis, remove haggis from all packaging. Place in a microwave dish, cover and place in the microwave. Cook on full power (800W) for 3 minutes. Remove and gently break up haggis with a fork then cook for a further 2 minutes. It should look like mince meat when done.

4. To serve, place haggis on plate, followed by a mound of neeps and a mound of tatties. Enjoy!


Haggis (check!), whisky (check!), Scottie Dog (check!) - for the full Scottish experience :D


If you enjoyed reading my posts, LIKE me on Facebook! Thanks :)

Wednesday, June 26, 2013

Recipe: Easy oven-baked salmon trout (Asian + Western-style)

Salmon is a fish which I love eating raw (salmon sashimi) or even smoked, but not so much when it is cooked. However, give me oven baked or pan fried salmon trout, and I would happily eat it. Strange but true. I find that salmon trout still have a very smooth and tender texture even when cooked, as well as a more delicate flavour which I prefer.

Salmon trout is also known as steelhead trout, rainbow trout, sea trout or Oncorhynchus mykiss. Yeah, so many different names just to add to the confusion. Salmon trout is basically a trout that, brought up in fresh water decides, at about two years old that it wants to head for the sea and develops glands that allow it to survive in salt water. It is similar to salmon in colour, however comparing both side by side, salmon trout will be a slightly lighter shade of pink/orange.  Salmon trout is an oily fish like salmon, and is high in essential omega-3 fatty acids.

Oven-baked salmon trout in teriyaki sauce (Asian style)

We bought two large Norwegian salmon trout fillets, about 1 inch thick (220-250g each). I decided to wrap it in foil and bake it in the oven in two different sauces. For every inch thickness, cook the fish for 10-12 minutes. The best texture and flavour is when the flesh has just become opaque and flakes easily with a fork.

The two sauces I chose to cook the salmon trout in are teriyaki sauce and a butter and herb sauce. Very very simple, simply mix the ingredients for the teriyaki sauce together and pour over the fish. As for the butter-herb sauce, simply dot the fish with butter and sprinkle with herbs (I used dried parsley). I also rubbed the fish with some ginger wine to get rid of any "fishy smells" that some people do not like (I didn't do it for the teriyaki sauce one since it already contains mirin and sake which will work the same). Baking in foil keeps the fish nice and moist.

Oven-baked salmon trout fillet with butter and parsley (Western style)


My father liked the Asian style teriyaki sauce fish whereas my mum preferred the Western butter-herb sauce fish. Win-win situation, I say as I get the best of both worlds :) I really like the silky smooth texture of the salmon trout. The teriyaki sauce is a mix of sweet-salty flavours whereas the butter-herb sauce is slightly salty. I garnished with the fish with some fresh dill from the garden.


Healthy and delicious... so good for you!


Love how smooth the fish is, flaky and nice!


After dinner we enjoyed some of these sugar apricots... :)


Oven-baked salmon trout with butter and parsley
Recipe by Baby Sumo
Preparation time: 2 minutes
Cooking time: 10-12 minutes
Serves 1-2


Ingredients
1 x 220-250g salmon trout fillet
20g butter, cut into small cubes
1/2 tsp dried parsley
1/2 tbsp ginger wine
Salt and pepper
Dill, to garnish
Cherry tomatoes, to garnish

1. Preheat oven to 180°C.

2. Prepare a piece of tin foil enough to form a parcel for the fish and place inside a baking tray.

3. Wash the fish fillet and pat dry with a kitchen towel. Place fish in the tin foil and drizzle with the ginger wine. Dot the butter all over the fish and then season with salt and pepper. Sprinkle the dried parsley on the fish, then bring the sides of the tin foil together, and pinch to seal and form a parcel.

4. Bake in preheated oven for 10-12 minutes, once a skewer/chopstick can go through, the fish is cooked.

5. Remove foil from baking tray and place onto serving plate. Garnish with some dill on top and cherry tomatoes on the side.


Oven-baked salmon trout fillet with teriyaki sauce
Recipe by Baby Sumo
Preparation time: 2 minutes
Cooking time: 10-12 minutes
Serves 1-2

Ingredients
1 x 220-250g salmon trout fillets
1/2 tbsp extra virgin olive oil
Salt and pepper
Dill, to garnish
Cherry tomatoes, to garnish

For the teriyaki sauce
1 tbsp Japanese soy sauce
1 tbsp mirin
1 tbsp sake
3/4 tbsp soft brown sugar

1. Preheat oven to 180°C.

2. Prepare a piece of tin foil enough to form a parcel for the fish and place inside a baking tray.

3. Wash the fish fillet and pat dry with a kitchen towel. Place fish in the tin foil and drizzle with olive oil. In a small bowl, mix the ingredients for the teriyaki sauce, then pour over the fish. Season with some salt and pepper. Seal the foil by bringing the sides of the tin foil together, and pinching to form a parcel.

4. Bake in preheated oven for 10-12 minutes, once a skewer/chopstick can go through, the fish is cooked.

5. Remove foil from baking tray and place onto serving plate. Garnish with some dill on top and cherry tomatoes on the side.


If you enjoyed reading my posts, LIKE me on Facebook! Thanks ;)

Tuesday, June 25, 2013

Liquid nitrogen gelato/yogurt @ NBrew, MidValley Megamall KL

N Brew is the first liquid nitrogen gelato/yogurt concept store to open in Malaysia. The store, originally at e@Curve has recently relocated to MidValley and has been opened for about 2 months there now. I accepted the owner's invitation to come to their store in MidValley and the kids got to tag along since Baby C had the day off school due to the haze. Ice cream galore!

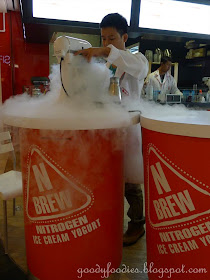
Smoky effect

The gelato and frozen yogurt here is made on the spot using liquid nitrogen and also contains no food colouring, stabilizers or preservatives. The set-up is a little bit like a science lab, with the staff donning lab coats as well as a huge periodic table (of NBrew) on one of the walls.

What is liquid nitrogen? Liquid nitrogen is nitrogen in a liquid state with an extremely low temperature and a boiling point of -196C, and can cause rapid freezing, hence its use in making ice cream. Using liquid nitrogen, the ice cream made has a super smooth  texture. With liquid nitrogen, NBrew can make gelato within minutes of you placing the order. For the kids, it was extremely fun watching the ice cream being made, and they were especially mesmerised by the smoky effect.

Some of the flavours you can get here


Periodic Table of NBrew


What makes NBrew different from others

The cream or custard or yogurt base mixture before  the LN2 is added


Test tubes - filled with Oreo and such


The magic begins


There are 7 standard gelato flavours, priced at RM9.90 for medium (2 scoops) and RM13.90 for large (3 scoops). There is also 5 standard premium gelato flavours, seasonal gelato (mango, watermelon, cucumber mint, lychee,apple pie, cempedak etc) and seasonal premium gelato (durian, orange cheesecake, nutty banana and gula melaka avocado). There is also liquid nitrogen yogurt as well as beverages such as coffee (beans from espressolab) and tea.

Peter, the owner tells us that the first flavour they came up with is the chocolate and nuts (RM9.90 for medium). I really like the smooth and creamy texture of the gelato, eating this is a little bit like having peanut butter and chocolate. Baby C's favorite is the intense chocolate (RM12.90 for medium), a gelato which is created for those who had nut allergy and couldn't enjoy the chocolate and nuts flavour. This is much darker and rich too.


Chocolate and nuts


Baby D's first order was the cookies and cream (RM9.90 for medium) - mummy likes this too!


They make the ice cream with liquid nitrogen first, then pour the cookie crumbs from a test tube.


This was our favorite flavour, gula melaka avocado (RM13.90 for medium). Not too sweet and very creamy. In future, customers can get the option of drizzling more gula melaka on top, which I think is a brilliant idea.

We also enjoyed the lemon cheesecake gelato (RM12.90 for medium) which was slightly tart, so I found it very appetizing. Peter tells us that they use a whole lemon fruit to make this. I also tried the mango yogurt (RM10.90) which is really good too, the kids enjoyed this very much. Sometimes, you may also get durian gelato (RM12.90) here - we found this quite mild tasting and not too pungent.


The race is on.. who will get to the gelato first?


Baby C won! *licks*


Baby D licks the one closer to him :P


Gelato love ♥ Sharing is caring ♥


Affogato (RM15) for mum since I dont take coffee - mum commented she likes the bitterness of the double espresso plus the subtle sweetness from the vanilla gelato


Coffee


Note: We opted for 1 scoop of gelato per flavour, however please note that a medium cup usually comes with 2 scoops. 


Verdict: Love watching how the gelatos are made using liquid nitrogen. Very smooth texture and just the right level of sweetness for me.

Opening times: 10am to 10pm daily.

Location: N Brew, F074A, MidValley Megamall, Mid Valley City, Lingkaran Syed Putra, 59200 Kuala Lumpur (near Cotton On).


Join their Facebook page here.


If you enjoyed reading my posts, LIKE me on Facebook! Thanks ;)